Orange Fennel Rosemary Salad

image1-133

I have been eating this salad on repeat for the last 4 weeks. With the beautiful oranges in season, this has become my “go-to“ salad this winter. It’s super easy, wonderfully delicious and very healthy (also Paleo and Whole 30 compliant). This is also a great salad you can prepare in advance for a dinner party because it just gets better with time and allows all of the flavors to marinate together. I thank my husband again for this wonderful Sicilian recipe.

image1-130image5image4-8image1-131image3-78image4-9image2-101image1-134.JPGimage3-79img_4915

INGREDIENTS: (serves 4)

4 large oranges (you can use any combination of sweet oranges; here I used 2 blood oranges & 2 navel oranges)

1 large fennel bulb (or 2 smaller ones)

1 fresh rosemary sprig

small handful of capers

coarse sea salt

generous drizzle or two of high quality extra virgin olive oil

freshly cracked pepper


INSTRUCTIONS:

  1. Trim the fennel bulb and cut in half. Thinly slice each half.
  2. Using a sharp knife, slice off both ends of each orange. Following the curve of the fruit, cut away the peel and white pith (keep the peels for their juice). Then thinly slice crosswise.
  3. In your serving dish, pour any juice that has accumulated on your work surface, including all of the juice that you can squeeze out of the cut peels.
  4. Line a layer of orange rings on the bottom of your dish and then layer with some fennel slices. Continue to layer with remaining orange rings and fennel.
  5. Pick the rosemary needles off the sprig and chop very finely and add to the salad.
  6. Add a small handful of capers.
  7. Season the salad to taste with a couple of pinches of coarse sea salt (very important there is enough salt), a generous drizzle or two of high quality extra virgin olive oil and freshly cracked pepper.
  8. Toss the salad and let it sit for at least 15-20 minutes before serving. Add another drizzle of olive oil and a pinch of sea salt if necessary right before serving.


Carrot Ginger Coconut Soup

image1-129.JPG

Last year, we  enjoyed a delicious dinner at the Wetterhorn Hotel in Hasliberg, which I highly recommend and they served this amazing carrot coconut soup.  Ever since, my best friend and I constantly reminisce of this soup because it was outstanding.

As snow has fallen over the Alps and the winter season has begun in Switzerland, I thought what a better time to recreate this delicious soup. This carrot ginger coconut soup is exactly what I need with the arrival of cold weather and the gloom that can come with a Swiss winter.

image2-98.JPGProcessed with VSCO with s2 presetProcessed with VSCO with s3 presetProcessed with VSCO with s3 presetProcessed with VSCO with s3 presetProcessed with VSCO with s3 preset

INGREDIENTS: (serves 4-6)

3 lbs carrots, peeled and chopped (1.5 kg)

1 large yellow onion chopped

2 tbsp extra virgin olive oil (20 g)

1 inch piece of fresh ginger, sliced (20 g)

4 whole kaffir lime leaves

2 lemongrass stalks

1 tbsp vegetable bouillon (25 g)

1.5 L hot water

1 cup coconut milk (250 ml)

1/2 fresh lime, juiced

Garnish (optional):

Fresh cilantro, chopped

Fresh chili, sliced

Hot chili flakes

INSTRUCTIONS:

  1. Peel and roughly chop carrots and 1 large yellow onion.
  2. Heat 2 tbsp of extra virgin olive oil on high in a large pot and saute the chopped onion. Turn the heat down to medium-high and continue to saute the onions for 2-3 minutes.
  3. Add the chopped carrots and saute on medium-high for another 2-3 minutes.
  4. In a tea kettle, boil 1.5 L of water.
  5. Add the fresh ginger slices, kaffir lime leaves, lemongrass stalks and vegetable bouillon to the pot and pour in 1.5 L of hot water.
  6. Bring the soup to a boil and then allow it to simmer for 35-40 minutes or until the carrots are fork tender.
  7. Once the carrots are tender, discard all kaffir lime leaves and lemon grass stalks. I also discarded half of the ginger slices as I did not want it overpowering.
  8. Place the contents of the soup into a blender and blend on high until smooth (you may have to work in batches depending on the size of your blender).
  9. Place the blended soup back in the pot and heat on medium temperature. Add 1 cup of coconut milk and the juice of 1/2 a lime. Stir well until the coconut milk is well incorporated.
  10. Serve warm and garnish with chopped cilantro and chili.


NOTES:

  • Kaffir lime leaves and lemongrass freeze well and I always keep a stock in my freezer for various curries and soup.
  • For the vegetable bouillon, we always have a stock of Knorr bouillon in the pantry.


Kabocha Squash Tart w/Ricotta, Caramelized Onions & Sage

Processed with VSCO with s2 preset

Fall is the time when I miss home the most. Having grown up in New Jersey, having spent my college years in Boston and post-college days in New York City, I truly miss the fall season in the northeast and all that comes with it: Indian summer, intense foliage color changes, apple cider donuts and of course Thanksgiving. Not to say the fall in Switzerland is not beautiful, but the cold weather seems to arrive much earlier and there can be many days filled with fog and rain, just like today… So I decided to make this tart to bring a little sunshine to this gray Sunday using my favorite squash that until this year, I could not find anywhere in Switzerland. I was overjoyed to find Kabocha squash this past week at the Juckerfarm in Jona-Rapperswil, which is a beautiful place to also find numerous varieties of pumpkins, squash, apples and pears. I even found Nashi pears!

Processed with VSCO with s3 presetProcessed with VSCO with s2 presetProcessed with VSCO with s3 preset

As it is Kürbiszeit (“pumpkin time” in German), almost everyone I know in Switzerland is making pumpkin soup, but I wanted to make something else that was just as savory and full of pumpkin flavor. This tart recipe was inspired from conversations I have had in the past few days with colleagues and friends about their favorite pumpkin/squash recipes. It was super easy to make since I used pre-made puff pastry and works perfectly for a Sunday brunch and paired with a salad, it makes for a great weeknight dinner. Let the Kürbiszeit continue!

Processed with VSCO with s2 presetProcessed with VSCO with s2 presetProcessed with VSCO with s2 presetProcessed with VSCO with s2 presetProcessed with VSCO with s2 presetProcessed with VSCO with s3 presetProcessed with VSCO with s3 presetProcessed with VSCO with s2 preset

INGREDIENTS: (serves 4-6)

1 lb. Kabocha Squash (225 g or 1/4 of a medium sized Kabocha squash)

1 L water for steaming

4 medium yellow onions

2 tbsp extra virgin olive oil

1/2 tsp salt (1.5 ml)

1 cup ricotta (250 g)

Salt & pepper to taste

1 puff pastry sheet (270 g, octagon/circular shape if available)

butter to grease tart dish

5-6 fresh sage leaves

1 egg

INSTRUCTIONS:

  1. Preheat oven to 395F (200C).
  2. Wash the Kabocha squash, cut into quarters and scoop the seeds out. Use one quarter (or a part equivalent to 1 lb.) and place onto a steamer basket in a large pot with 1 L of water. Place the lid onto the pot and steam for approx. 20 minutes or until fork tender and then set aside to cool.
  3. While the squash is steaming, thinly slice 4 medium yellow onions.
  4. Heat 2 tbsp of extra virgin olive oil on high in a large frying pan and add in the sliced onions. Continue to cook the onions on medium-high heat and stir regularly. Season the onions with 1/2 tsp salt and cook the onions until a medium-brown (approx. 10-15 minutes). Set aside to cool.
  5. Season the ricotta with salt and pepper and mix well.
  6. Slice the cooked Kabocha squash into thin slices (the skin is tender so I kept it on).
  7. Grease the tart dish with butter and place the puff pastry into the dish and press firmly into the frame while folding in the edges.
  8. Place the sliced Kabocha squash onto the puff pastry and distribute evenly. Season the squash with salt, pepper and a generous drizzle of extra virgin olive oil.
  9. Add the seasoned ricotta cheese and distribute evenly onto the squash.
  10. Add the caramelized onions and distribute evenly.
  11. Garnish with a few sage leaves and brush the crust with egg wash.
  12. Bake for 30-35 minutes or until the crust is golden-brown.
  13. Remove from oven and allow the tart to cool for 5-10 minutes. It’s best to serve warm.


Swiss Schlangenbrot (Grilled “Snakebread”)

image1-93.JPG

For the past 6 years, we have been spending a long bank holiday weekend in May in le Plateau des Mille Etangs (plateau of 1000 ponds) in the Southern Vosges in the region of Alsace, France. It has become one of the highlights of my year and has become an annual tradition of ours. 4-5 days are spent in a remote cabin in the middle of nature’s beauty with my family and the family of brother-in-law. It’s a paradise for children and adults and time is only spent on fishing, paddle boating, taking naps in hammocks, flower picking, reading, playing card games and of course cooking. This is a place where apéro starts as early as you want it to with a glass of Crémant or Cidre and almost every meal is cooked on the grill. This trip really marks the start of the warm weather and witnessing spring in bloom in this beautiful natural paradise is a privilege.

IMG_8429.JPGDSC_0175_2.JPGIMG_9548.JPGIMG_9533.JPG

Last year was the first time I was introduced to Schlangenbrot, which is a dough that is rolled out on a stick like a snake and is baked over an open fire. It is a very common dish to enjoy while camping because the dough is super easy to make and of course, you need an open fire to bake it. It’s as ubiquitous to the Swiss as s’mores are to Americans. This year, with the help of my lovely sister-in-law, we wrote out the recipe and added in fresh rosemary. Let the grill season begin!

image3-54.JPGProcessed with VSCO with s2 presetimage2-69.JPGProcessed with VSCO with s2 presetimage1-100.JPGProcessed with VSCO with s2 presetProcessed with VSCO with s2 presetimage1-103.JPGimage2-73.JPGimage4-5.JPGimage2-75.JPGimage3-59.JPGimage1-104.JPGimage3-60.JPGimage2-76.JPGimage2-77.JPGimage1-105.JPGimage3-61.JPGimage1-106.JPGimage2-78.JPGProcessed with VSCO with s2 preset


INGREDIENTS (approx. 6 bread sticks):

4 cups all-purpose flour (525 g)

1 1/2 cups warm water (300 g)

2.5 tsp dry yeast (7 g)

1 tsp salt (1 TL)

1 tbsp extra virgin olive oil (1 EL)

6 sticks for baking


INSTRUCTIONS:

  1. Place 4 cups of flour in a large mixing bowl.
  2. Make a well in the center of the flour and add in 2.5 tsp of the dry yeast in the center and add in 1/2 of warm water. Mix the yeast and warm water to make a sludge and let it sit for about 10 minutes.
  3. Sprinkle 1 tsp salt in the perimeter of the flour.
  4. After about 10 minutes, add in another 1/2 cup of warm water to your dough mixture and start to mix with your hands. Add in the last 1/2 cup of warm water and 1 tbsp of extra virgin olive oil. Mix the dough with your hands until the flour is well incorporated.
  5. Take the dough out of the mixing bowl and knead on a flat surface for approximately 15-20 minutes until air bubbles start to form in your dough and the dough is smooth.
  6. Form a ball with the dough and place it back in the mixing bowl. Cover the bowl with plastic wrap and a kitchen towel on top and place in a warm spot for at least 1 hour to rest. I let mine rest for 90-12o minutes.
  7. Once the dough has rested, finely chop fresh rosemary and fold it into the dough.
  8. Break the dough into 6 equal pieces and roll them out into “snakes” with your hands.
  9. Wrap each “snake” onto a stick and grill them over an open fire. If you have a grill over the fire, you can place them directly down on the grill or you can roast them over the fire like marshmallows.
  10. Make sure you turn the sticks continually to bake the dough slowly and to achieve a nice brown crust around the bread. Cooking times will vary due to the temperature of the fire, but make sure the dough is completely cooked through.
  11. Serve with extra virgin olive seasoned with sea salt and herbs and enjoy!

Korean Pancake with Wild Garlic, Scallions & Zucchini (Pajeon)

image1-84.JPG

One of the first signs of spring for me here in Switzerland is wild garlic (Bärlauch in German). As soon as the snow starts to melt and we have a few warmer days at the end of the winter, you can start to spot wild garlic. And as soon as it really feels like spring, you see these leaves pop up everywhere and in abundance!

image1-73.JPG

Wild garlic or Allium ursinum can often be found in shady and moist areas. And if you see them growing somewhere once, they will most likely be growing there year after year. The best time to eat this wild garlic is in the first half of spring before they start to flower. And when picking your own wild garlic, go for the younger and smaller leaves as they are more delicate in taste. As you pick these leaves, you can instantly smell garlic and that garlic taste is stronger when eaten raw.

image1-82.JPG

For some reason, today was the first time I ever thought of using wild garlic in Korean food. I have no idea why it took me so long considering Koreans use garlic in almost every dish! So I thought to myself, why not pick some wild garlic today since the season is coming to end soon and add it to Korean Scallion Pancakes (Pajeon)? I added lots of wild garlic, green onions and zucchini to make this very green and very delicious pancake (Jeon in Korean) on this beautiful spring day.

Processed with VSCOcam with s2 presetimage1-81.JPGimage1-79.JPGimage2-60.JPGimage2-59.JPGimage3-47.JPGimage1-78.JPGProcessed with VSCOcam with s3 preset

INGREDIENTS (makes 1 large pancake)

1/2 cup white flour (70 g)

1/2 cup rice flour (60 g)

1 cup cold water (235 ml)

3/4 tsp salt (4-5 g)

pinch of sugar

1/2 tsp fermented Korean soybean paste (optional or can substitute miso)

1 cup julienned zucchini (90 g)

1 cup roughly chopped wild garlic (20 g)

1 cup roughly chopped green onions length-wise (40g)

vegetable oil to fry pancake

For the Soy Dipping Sauce

2 1/2 tbsp soy sauce

2 tbsp rice vinegar

1 tbsp mirin

few drops of sesame oil

freshly cracked pepper

green onion slices for garnish

INSTRUCTIONS

  1. In a large bowl, mix the white flour, rice flour and cold water and mix well. Whisk in the salt, pinch of sugar and soybean paste until well mixed. Let the batter sit for 5 minutes or so.
  2. Add in the zucchini, wild garlic and green onions and mix to make sure the vegetables are evenly distributed.
  3. Heat a large frying pan on high and add in approx. 2 tbsp of vegetable oil. When the pan is piping hot, pour all of the pancake mixture and spread evenly on the pan.
  4. When the edges start to brown, flip your pancake over and fry the other side until golden brown. Add a bit more vegetable oil if necessary.
  5. Once both sides are crispy golden brown, slice and serve hot with soy dipping sauce.
  6. For the dipping sauce, mix soy sauce, rice vinegar, mirin, sesame oil, pepper and green onion slices in a small bowl.


NOTES

  • For an extra crispy pancake, make this ahead of time and when ready to serve, heat and fry the pancake on both sides again.


Morrocan Carrot Dip w/Feta, Kalamata Olives & Capers

Processed with VSCOcam with s2 preset

This past weekend, we celebrated my husband and his twin sister’s birthday along with my beautiful mother-in-law and a couple of dear friends in Basel. Since I moved to Switzerland over 6 years ago, visiting my sister-in-law has always been a special treat for me and has become a bit of a monthly ritual. We always arrive on a Saturday afternoon and everytime we walk into her house, we are always greeted with so much love, the most beautiful flower arrangements and of course wonderful food, wine and company. What makes these weekends even extra special is that we spend most of our time in the kitchen, where we always cook together, enjoy delicious food and simply have a great time together. And on Sundays, our routine is to start off with a homemade brunch that always includes soft-boiled eggs since my sister-in-law is the master and then a Sunday stroll to the zoo or a museum.

image2-55.JPG

I decided to make this Morrocan-inspired Carrot dip for this occasion because of course, there is always an apero to start the evening and I was just recently introduced to this dish a few weeks ago when we were invited to some friends’ house for dinner. This dip was so good that I have made my own version of it 3 times in the last 3 weeks… This recipe is very easy and the combination of carrots, cumin and feta is just delicious!

Processed with VSCOcam with s2 presetProcessed with VSCOcam with s2 presetProcessed with VSCOcam with s2 presetProcessed with VSCOcam with s2 presetProcessed with VSCOcam with s2 presetimage1-71.JPGProcessed with VSCOcam with s2 presetProcessed with VSCOcam with s2 presetProcessed with VSCOcam with s2 preset

INGREDIENTS (approx. 6 servings)

6-7 carrots

1 medium-sized white onion

2 tbsp (30 ml) plus 1/4 cup (60 ml) extra virgin olive oil

6 garlic cloves

1 tsp (6 g)  salt

2 tbsp (30 ml) balsamic vinegar

1 tbsp (6 g) ground cumin

1 squirt of harissa (optional and more/less to your heat liking)

1 packet of good feta cheese (7 oz. or 200g; break into crumbled pieces with your hands)

handful of Kalamata olives (pitted and sliced)

small handful of capers

small handful of chopped raw walnuts

a sprinkle of Pul Biber (optional or you can add normal crushed red pepper flakes)

INSTRUCTIONS

  1. Peel 6-7 carrots and slice them approx. 1/4 inch thick.
  2. Place sliced carrots in a medium-sized saucepan and add water until all the carrots are fully covered. Boil until the carrots are tender (15 minutes or so).
  3. Finely chop the white onion and saute in 2 tsbp olive oil on medium-high until transluscent. Add in 3 chopped garlic cloves and stir for about 30 seconds and then set aside.
  4. Once the carrots are tender, drain the water and place carrots into a food processor. Add in the sauteed onion and garlic, 1/4 cup olive oil, salt, balsamic vinegar, ground cumin, harissa and 3 remaining whole garlic cloves. Blend on high until the mixture is silky and smooth.
  5. Spread the carrot puree onto a platter and top with crumbled feta, sliced kalamata olives, capers and walnuts. Sprinkle some Pul Biber on top and a last drizzle of good quality extra virgin olive oil.
  6. Serve with crackers, flat bread, baguette slices, or pita bread slices.


NOTES

  • Buy good quality feta cheese and I prefer to buy the block of feta and then hand crumble it myself.

Korean Mungbean Pancakes (Bindaetteok)

image3-33.JPG

If there’s one recipe I’m most proud of having learned from my mother, it’s definitely her Korean Mungbean Pancakes (Bindaetteok). My mom is one of the best cooks I know because when she cooks for people, she is so incredibly selfless and her food is genuinely made with love. If someone were to ask me what her best dish is, it’s her Bindaetteok, hands down.

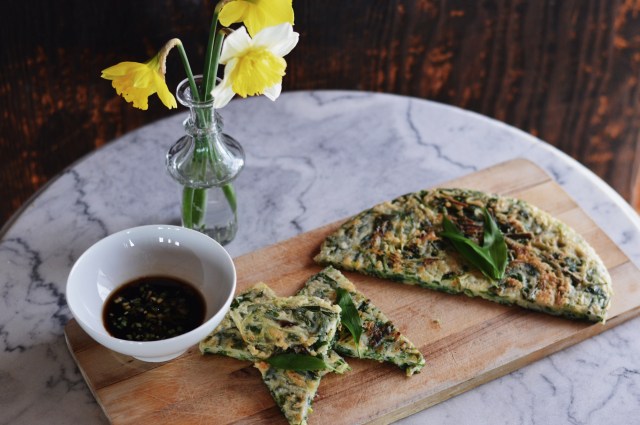
Bindaetteok is a savory pancake made from dried mung beans, which are soaked in water then blended and mixed with vegetables and ground pork. This dish dates back to the late 1600s and originates from the northern part of Korea, which is where my mother’s side of the family comes from (pre-war) and are traditionally made on a full moon.

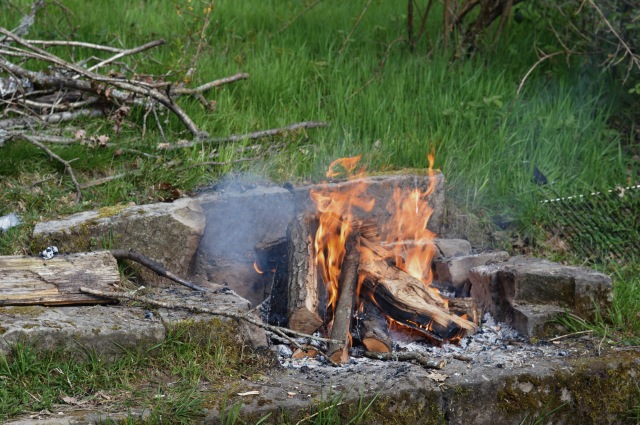
I think everytime my mom makes these pancakes, it brings back fond memories of her childhood. My mother grew up in Seoul with 6 siblings and 3 boy cousins who lived next door and she used to tell me how she remembers making these pancakes outside on a large iron skillet over an open fire, where she and her sisters and mother would always make a huge batch of Bindaetteok. They even had to grind the beans by hand using a stone grinder. And because during her childhood meat was expensive and hard to come by, they would make these pancakes with just vegetables and fry them in lard.

Until this day, my mom still only makes these pancakes on a full moon day and in celebration of the lunar new year tomorrow, I would like to share this very special dish with you that is very close to my family and to my heart.

Processed with VSCOcam with s2 presetimage1-54.JPGProcessed with VSCOcam with s2 presetProcessed with VSCOcam with s2 presetProcessed with VSCOcam with s2 presetimage2-40.JPGimage1-56.JPGimage1-57.JPGimage2-41.JPGimage2-42.JPGimage3-34.JPGimage1-58.JPGimage2-43.JPGimage3-35.JPGProcessed with VSCOcam with s2 presetProcessed with VSCOcam with s2 presetimage1-59.JPGimage2-44.JPGimage1-60.JPG


INGREDIENTS (approx. 5 dozen pancakes)

42 ounces dried mung beans (1.2 kg)

cold water for soaking mung beans

2 lb. good quality ground pork (900 g)

1 medium size head of Napa cabbage thinly chopped (800 g)

3 cups fresh mung bean sprouts (100 g)

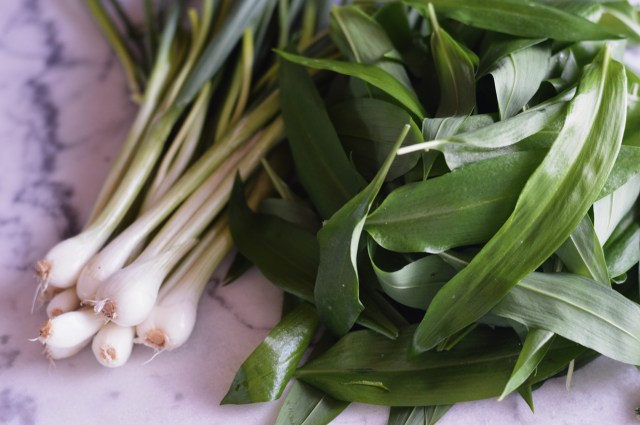
3-4 scallions bunches sliced diagnolly (100 g)

1 large white onion sliced thinly (I used 2 small ones)

4 garlic cloves minced

1 inch ginger piece grated (2.5 cm)

2 tsp salt (11.5 g)

4 tbsp sesame oil (55 g)

freshly cracked black pepper

extra salt for batter mixture

vegetable oil for frying

For Dipping Sauce

1/2 cup soy sauce (150 g)

1.5 tbsp rice wine vinegar (25 g)

2 tbsp mirin (30 g)

freshly cracked black pepper

chopped scallions for garnch

a dash of Korean dry crushed red pepper (optional)


INSTRUCTIONS

  1. Pour the dry mung beans in a large colander and rinse in cold water for a few minutes.
  2. Place the mung beans in a large bowl and cover with cold water until the beans are fully immersed in water with at least 1 inch of water above the beans. Cover and soak them overnight at room temperature.
  3. Thinly chop the head of Napa cabbage and place in a large pot along with all of the fresh mung bean sprouts. Fill the pot with cold water until at least 1/2 of the vegetables are immersed in water. Boil for 3-4 minutes.
  4. Drain the cooked Napa cabbage and mung bean sprouts and rinse with cold water. Squeeze all excess water out of the vegetables and place them in a large mixing bowl.
  5. Add in the ground pork, thinly sliced white onions, sliced scallions, minced garlic, grated ginger, salt, sesame oil and freshly cracked black pepper. Mix well with your hands.
  6. Let the pork-vegetable mixture marinate overnight or for at least 2-3 hours in the refrigerator.
  7. To prepare the pancake batter, do not drain your soaked mung beans. Place 5 cups of the water soaked mung beans (just scoop generously from the middle of the bowl) in a blender and blend on high for about 1 minute or unil the mixture is smooth.
  8. Place the batter in a large mixing bowl and add 2 cups of the meat filling along with 1 tsp salt. Mix well.
  9. Turn your frying pan on high and add a generous amount of vegetable oil. When your pan is piping hot, pour approx. 1/4 cup of your pancake batter into the pan for each pancake. I was able to fit 3 pancakes at one time.
  10. Take a spoon and smooth out the pancake batter to make a nice circular and even shape.
  11. Once the bottom of the pancakes are golden brown, flip over and cook the other side until golden brown. I like to add a little bit more vegetable oil after I flip my pancakes to ensure each side is nice and crispy.
  12. Place the pancakes on a large plate lined with paper towels to soak up the excess oil.
  13. Mix the ingredients for your dipping sauce in a bowl and serve with the hot pancakes.


NOTES

  • You can store these pancakes in the freezer if well packed for up to 3 months.


Hummus with Zatar

Processed with VSCOcam with s2 preset

I first tasted my friend Aviva’s hummus over our New Year’s trip and I have to say that it is the best hummus I have ever had. Something about the creaminess and the kick of garlic makes this sensational.

I met Aviva just last May through a mutual friend in the U.S. and we bonded instantly over our love of food and cooking. In the last couple of weeks, I have had many opportunities to cook with her and what I love about Aviva is that she always cooks meals and dishes with 150% enthusiasm and effort AND her food is delicious.

I recently saw an episode of “The Mind of a Chef” when David Chang eats at the yakitori restaurant, Bird Land, in Tokyo. I remember the chef saying, “you cannot betray what they expect, but you have to go above it in some way too.” This resonates with me in how Aviva cooks because when she cooks a dish, she wants to make sure that it’s the best and she will take all the time to do it without shortcuts.

I am in no way trying to compare ourselves to a Michelin-starred chef, but I do believe and know that when you cook with so much effort and love, this does translate in your food. Well, as long as you CAN cook, that is…

After 2 coaching sessions, here is Aviva’s hummus recipe.

Processed with VSCOcam with s2 presetProcessed with VSCOcam with s2 presetProcessed with VSCOcam with s2 presetimage1-52.JPGProcessed with VSCOcam with c1 presetProcessed with VSCOcam with c1 presetProcessed with VSCOcam with s2 preset

INGREDIENTS

4 cups (500 g) dry chickpeas

water to soak & cook chickpeas

1 1/4 cups (295 ml) water

3/4 cup (180 g) tahini

6 tbsp (87 g) extra virgin olive oil

3 tsp (17 g) salt

2 lemons, cut into segments

6-7 cloves of garlic

For Garnish:

zatar (optional)

premium extra virgin olive oil (optional)


INSTRUCTIONS

  1. Place your dry chickpeas in a large bowl or pot and fill with cold water until the chickpeas are fully immersed in water with at least 1-2 inches of water above the peas. Cover and soak them overnight at room temperature.
  2. Drain the chickpeas and place them in a medium-size pot and fill with water again until the chickpeas are fully immersed in water with about 1 inch of water above the peas. Bring the peas to a boil and continue to boil at a medium-high heat for approximately 25-30 minutes or until well-cooked (this may vary depending on the brand of chickpeas so taste to see if they are tender after at least 20 minutes).
  3. When the chickpeas are fully cooked and tender, drain them, rinse with cold water and let them cool to room temperature.
  4. Place the cooked chickpeas into a large food processor (if you have a smaller one, you can work in 2 batches) along with 3/4 cup of water, 3/4 cup tahini, 6 tbsp extra virgin olive oil, 3 tsp salt, lemon segments and garlic cloves. Pulse on a high speed until all ingredients are well blended. It will take several minutes for the chickpeas to become well blended.
  5. Check the consistency of your hummus and add in the remaining water in a 1/4 cup at a time as chickpeas can vary in how much water they absorb during the soaking process. If needed, add in more water to your liking of consistency.
  6. Garnish with zatar and a generous drizzle of premium extra virgin olive oil and serve with your choice of fresh vegetables.


NOTES

  • This hummus is extra good with kohlrabi sticks, which is a vegetable I only became familiar with when I moved to Switzerland. Another name for kohlrabi is German cabbage and it’s crunchy, sweet and delicious. Apparently, it’s Heidi Klum’s favorite snack.

Toast Skagen (Prawns on Toast)

Processed with VSCOcam with s2 preset

This holiday season, I was lucky enough to spend New Year’s Eve with 3 of my favorite girlfriends in Switzerland plus their families in a cozy chalet in a small town just a few miles outside of Chamonix in the French Alps. These lovely ladies also happen to be some of the best cooks I know, which was important considering we cooked 2-3 meals a day for 9 adults plus 6 kids (between the ages of 1-6) over a course of 5 days. Yes, that’s a lot of food! Some of our meals included Saltimbocca with Porcini Risotto, Swiss Raclette, Chinese Hot Pot and much much more.

In the next couple of weeks, I will be sharing some of the fantastic meals and recipes that were shared on this beautiful trip among a wonderful group of friends who love to enjoy good food, good wine and most importantly, good company.

Processed with VSCOcam with a5 presetimage1-32.JPG

The first recipe is the traditional Swedish Toast Skagen (Prawns on Toast) that my Finnish friend Jenni made on New Year’s Eve for an apéro. The one thing I love about the Europeans is that they love their apéro, which is just another term for “cocktail hour” and there are always small bites to eat to wet your appetite. This is also my favorite part of the meal, except for the fact that I usually eat too much and by the time we sit down for dinner, I am usually almost always full.

Toast Skagen is a perfect starter for a celebratory meal and try pairing them with Champagne (we were drinking Philippe Gonet & Veuve Clicquot) and oysters on the half shell. That’s what we did since we were in France and it’s obligatory, right?

image1-27.JPGimage2-18.JPGProcessed with VSCOcam with s2 presetProcessed with VSCOcam with s2 presetProcessed with VSCOcam with s3 presetProcessed with VSCOcam with s2 presetProcessed with VSCOcam with s2 presetProcessed with VSCOcam with s2 presetProcessed with VSCOcam with s2 presetProcessed with VSCOcam with s2 preset

INGREDIENTS (approx. 2-3 dozen toasts depending on size of bread)

3/4 cup créme fraiche

1 tbsp fresh squeezed lemon juice

1/2 tsp lemon rind

1/2 tsp salt

2 tbsp chopped dill

freshly cracked black pepper

1 cup chopped cooked shrimp (I used about 1 dozen of the small 51/60 size)

For the Toast:

1 large baguette (cut into 1/2 inch slices)

3 tbsp extra virgin olive oil

1 large fresh garlic clove minced

salt and pepper to taste

For the Garnish:

chopped dill

chopped shallots (or red onions or green onions)

lemon rind (optional as I used my leftovers)

salmon roe

freshly cracked black pepper

INSTRUCTIONS

  1. Preheat your oven to 400F and on the grill function, which I think is the best and quickest way to make toast.
  2. Slice your baguette into about 1/2 inch slices and place them on a baking tray lined with parchment paper.
  3. In a small bowl, mix the olive oil, minced garlic and a pinch of salt and pepper. Brush this mixture onto each piece of sliced baguette. Set aside for now.
  4. In a medium bowl, whisk the créme fraiche, freshly squeezed lemon juice, lemon rind, salt, dill, pepper and cooked shrimp. Mix until the ingredients are well incorporated and place in the refrigerator until you are ready to assemble your toasts.
  5. Place the baguette slices into the oven for about 3-4 minutes or until golden brown. Make sure you watch them as this might take a bit longer or shorter depending on your oven. Once they are golden brown, let the toasts cool down to room temperature.
  6. While your toasts are cooling down, prepare your garnishes.
  7. When you are ready to assemble, place a generous spoonful of the shrimp mixture onto a toast and garnish with dill, shallots, lemon rind, salmon roe and freshly cracked black pepper.


NOTES:

  • I would try to stay away from using baby shrimp for this dish. Baby shrimp tend to have little texture and are quite mushy and not appetizing in my opinion.


Smoked Trout Dip

DSC_1230

The holidays are literally around the corner and this is a recipe that is super easy and even all of the kids in our family love it. There’s only one person I know who wouldn’t like it because she has a thing against white condiments. Not sure if cream cheese is considered a condiment, but not worth a discussion.

Anyway, I now make this dip every Christmas after popular demand from my nephew who also likes to eat anchovies for breakfast. And come to think of it, I make this dip for almost every party I host. And trust me on this, when you make it, put a bit away for yourself because this dip goes fast.

Continue reading “Smoked Trout Dip”