Korean Pancake with Wild Garlic, Scallions & Zucchini (Pajeon)

image1-84.JPG

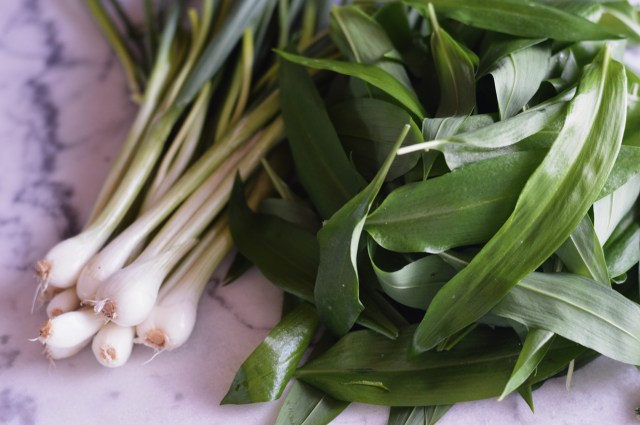
One of the first signs of spring for me here in Switzerland is wild garlic (Bärlauch in German). As soon as the snow starts to melt and we have a few warmer days at the end of the winter, you can start to spot wild garlic. And as soon as it really feels like spring, you see these leaves pop up everywhere and in abundance!

image1-73.JPG

Wild garlic or Allium ursinum can often be found in shady and moist areas. And if you see them growing somewhere once, they will most likely be growing there year after year. The best time to eat this wild garlic is in the first half of spring before they start to flower. And when picking your own wild garlic, go for the younger and smaller leaves as they are more delicate in taste. As you pick these leaves, you can instantly smell garlic and that garlic taste is stronger when eaten raw.

image1-82.JPG

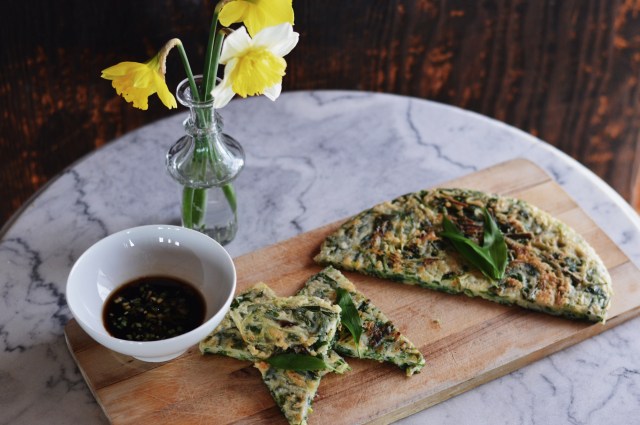
For some reason, today was the first time I ever thought of using wild garlic in Korean food. I have no idea why it took me so long considering Koreans use garlic in almost every dish! So I thought to myself, why not pick some wild garlic today since the season is coming to end soon and add it to Korean Scallion Pancakes (Pajeon)? I added lots of wild garlic, green onions and zucchini to make this very green and very delicious pancake (Jeon in Korean) on this beautiful spring day.

Processed with VSCOcam with s2 presetimage1-81.JPGimage1-79.JPGimage2-60.JPGimage2-59.JPGimage3-47.JPGimage1-78.JPGProcessed with VSCOcam with s3 preset

INGREDIENTS (makes 1 large pancake)

1/2 cup white flour (70 g)

1/2 cup rice flour (60 g)

1 cup cold water (235 ml)

3/4 tsp salt (4-5 g)

pinch of sugar

1/2 tsp fermented Korean soybean paste (optional or can substitute miso)

1 cup julienned zucchini (90 g)

1 cup roughly chopped wild garlic (20 g)

1 cup roughly chopped green onions length-wise (40g)

vegetable oil to fry pancake

For the Soy Dipping Sauce

2 1/2 tbsp soy sauce

2 tbsp rice vinegar

1 tbsp mirin

few drops of sesame oil

freshly cracked pepper

green onion slices for garnish

INSTRUCTIONS

  1. In a large bowl, mix the white flour, rice flour and cold water and mix well. Whisk in the salt, pinch of sugar and soybean paste until well mixed. Let the batter sit for 5 minutes or so.
  2. Add in the zucchini, wild garlic and green onions and mix to make sure the vegetables are evenly distributed.
  3. Heat a large frying pan on high and add in approx. 2 tbsp of vegetable oil. When the pan is piping hot, pour all of the pancake mixture and spread evenly on the pan.
  4. When the edges start to brown, flip your pancake over and fry the other side until golden brown. Add a bit more vegetable oil if necessary.
  5. Once both sides are crispy golden brown, slice and serve hot with soy dipping sauce.
  6. For the dipping sauce, mix soy sauce, rice vinegar, mirin, sesame oil, pepper and green onion slices in a small bowl.


NOTES

  • For an extra crispy pancake, make this ahead of time and when ready to serve, heat and fry the pancake on both sides again.


Korean Mungbean Pancakes (Bindaetteok)

image3-33.JPG

If there’s one recipe I’m most proud of having learned from my mother, it’s definitely her Korean Mungbean Pancakes (Bindaetteok). My mom is one of the best cooks I know because when she cooks for people, she is so incredibly selfless and her food is genuinely made with love. If someone were to ask me what her best dish is, it’s her Bindaetteok, hands down.

Bindaetteok is a savory pancake made from dried mung beans, which are soaked in water then blended and mixed with vegetables and ground pork. This dish dates back to the late 1600s and originates from the northern part of Korea, which is where my mother’s side of the family comes from (pre-war) and are traditionally made on a full moon.

I think everytime my mom makes these pancakes, it brings back fond memories of her childhood. My mother grew up in Seoul with 6 siblings and 3 boy cousins who lived next door and she used to tell me how she remembers making these pancakes outside on a large iron skillet over an open fire, where she and her sisters and mother would always make a huge batch of Bindaetteok. They even had to grind the beans by hand using a stone grinder. And because during her childhood meat was expensive and hard to come by, they would make these pancakes with just vegetables and fry them in lard.

Until this day, my mom still only makes these pancakes on a full moon day and in celebration of the lunar new year tomorrow, I would like to share this very special dish with you that is very close to my family and to my heart.

Processed with VSCOcam with s2 presetimage1-54.JPGProcessed with VSCOcam with s2 presetProcessed with VSCOcam with s2 presetProcessed with VSCOcam with s2 presetimage2-40.JPGimage1-56.JPGimage1-57.JPGimage2-41.JPGimage2-42.JPGimage3-34.JPGimage1-58.JPGimage2-43.JPGimage3-35.JPGProcessed with VSCOcam with s2 presetProcessed with VSCOcam with s2 presetimage1-59.JPGimage2-44.JPGimage1-60.JPG


INGREDIENTS (approx. 5 dozen pancakes)

42 ounces dried mung beans (1.2 kg)

cold water for soaking mung beans

2 lb. good quality ground pork (900 g)

1 medium size head of Napa cabbage thinly chopped (800 g)

3 cups fresh mung bean sprouts (100 g)

3-4 scallions bunches sliced diagnolly (100 g)

1 large white onion sliced thinly (I used 2 small ones)

4 garlic cloves minced

1 inch ginger piece grated (2.5 cm)

2 tsp salt (11.5 g)

4 tbsp sesame oil (55 g)

freshly cracked black pepper

extra salt for batter mixture

vegetable oil for frying

For Dipping Sauce

1/2 cup soy sauce (150 g)

1.5 tbsp rice wine vinegar (25 g)

2 tbsp mirin (30 g)

freshly cracked black pepper

chopped scallions for garnch

a dash of Korean dry crushed red pepper (optional)


INSTRUCTIONS

  1. Pour the dry mung beans in a large colander and rinse in cold water for a few minutes.
  2. Place the mung beans in a large bowl and cover with cold water until the beans are fully immersed in water with at least 1 inch of water above the beans. Cover and soak them overnight at room temperature.
  3. Thinly chop the head of Napa cabbage and place in a large pot along with all of the fresh mung bean sprouts. Fill the pot with cold water until at least 1/2 of the vegetables are immersed in water. Boil for 3-4 minutes.
  4. Drain the cooked Napa cabbage and mung bean sprouts and rinse with cold water. Squeeze all excess water out of the vegetables and place them in a large mixing bowl.
  5. Add in the ground pork, thinly sliced white onions, sliced scallions, minced garlic, grated ginger, salt, sesame oil and freshly cracked black pepper. Mix well with your hands.
  6. Let the pork-vegetable mixture marinate overnight or for at least 2-3 hours in the refrigerator.
  7. To prepare the pancake batter, do not drain your soaked mung beans. Place 5 cups of the water soaked mung beans (just scoop generously from the middle of the bowl) in a blender and blend on high for about 1 minute or unil the mixture is smooth.
  8. Place the batter in a large mixing bowl and add 2 cups of the meat filling along with 1 tsp salt. Mix well.
  9. Turn your frying pan on high and add a generous amount of vegetable oil. When your pan is piping hot, pour approx. 1/4 cup of your pancake batter into the pan for each pancake. I was able to fit 3 pancakes at one time.
  10. Take a spoon and smooth out the pancake batter to make a nice circular and even shape.
  11. Once the bottom of the pancakes are golden brown, flip over and cook the other side until golden brown. I like to add a little bit more vegetable oil after I flip my pancakes to ensure each side is nice and crispy.
  12. Place the pancakes on a large plate lined with paper towels to soak up the excess oil.
  13. Mix the ingredients for your dipping sauce in a bowl and serve with the hot pancakes.


NOTES

  • You can store these pancakes in the freezer if well packed for up to 3 months.


Korean New Year’s Day Soup (Duk Mandu Gook)

image1-22.JPG

One of my life regrets is that I never learned how to speak Korean, especially knowing that I could truly have been bilingual having grown up in America and in a Korean immigrant family. Only speaking one language has even felt more like a handicap now that I live in Europe. For example, I work in an office of about 100 people and I among the other 7 Americans and Brits are probably the only ones who don’t speak a second or third language fluently. Embarrassing? Yes.

I do however feel proud that I can cook Korean food. When I was growing up, I always hung out in the kitchen with my mom as a way to get out of practicing the violin or piano (I know, super Korean). I would always ask to help season soups, peel garlic, assemble mandu (Korean dumplings) or even take the stems off bushels of soy bean sprouts. Looking back now, I am very thankful to have spent so much time with my mom in the kitchen because cooking Korean food has become something natural to me and of course I get to enjoy a meal that’s absolutely delicious and always brings me back home.

I know it’s already 5 days past New Year’s Day, but I had to make this because I’ve been eating this soup almost every start of the new year since I was born. And to be honest, I didn’t make this on the 1st because frankly, it’s a lot of work and was not in any condition to be working in the kitchen most of the day, but I tell you it’s worth it! And of course, this soup can be enjoyed anytime of the year, but it is most traditionally served on New Year’s Day in Korea to honor becoming a year older. I hope you enjoy this recipe and share it with your loved ones!

Oh and I just realized as I was writing this blog post that I forgot the roasted seaweed as a garnish, but it’s still delicious without it!

Continue reading “Korean New Year’s Day Soup (Duk Mandu Gook)”

One-Jar Kimchi

Processed with VSCOcam with s3 preset

As everyone is gearing up for the big festivities tomorrow, I am making a side dish that can arguably be an essential to the Thanksgiving spread, but that’s debatable and I leave that up to you.

Unfortunately, I don’t eat Korean food as often as I would like to and I definitely don’t make the portion sizes as my mom does when I do. So I wanted to share her recipe for a quick, fresh and easy kimchi that can be eaten right after it’s made, but in a portion size that is not intimidating. And considering I don’t eat Korean food everyday and more importantly, I don’t want kimchi stinking up my fridge for days on end, I’ve adjusted the portion to fit in a good-sized jar that you might have just emptied and placed in your recycling bin, but feel free to double or triple the recipe!

Continue reading “One-Jar Kimchi”