Kabocha Squash Tart w/Ricotta, Caramelized Onions & Sage

Processed with VSCO with s2 preset

Fall is the time when I miss home the most. Having grown up in New Jersey, having spent my college years in Boston and post-college days in New York City, I truly miss the fall season in the northeast and all that comes with it: Indian summer, intense foliage color changes, apple cider donuts and of course Thanksgiving. Not to say the fall in Switzerland is not beautiful, but the cold weather seems to arrive much earlier and there can be many days filled with fog and rain, just like today… So I decided to make this tart to bring a little sunshine to this gray Sunday using my favorite squash that until this year, I could not find anywhere in Switzerland. I was overjoyed to find Kabocha squash this past week at the Juckerfarm in Jona-Rapperswil, which is a beautiful place to also find numerous varieties of pumpkins, squash, apples and pears. I even found Nashi pears!

Processed with VSCO with s3 presetProcessed with VSCO with s2 presetProcessed with VSCO with s3 preset

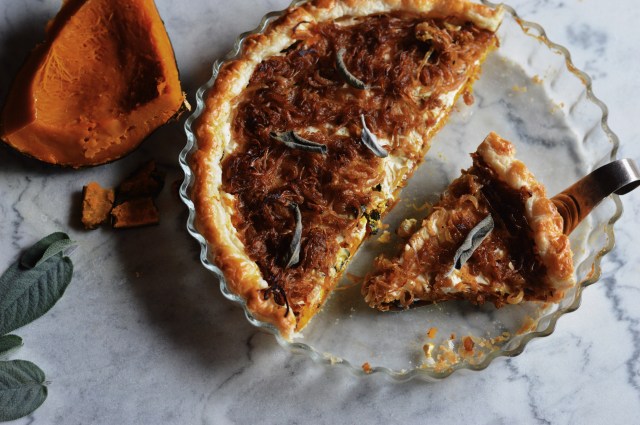
As it is Kürbiszeit (“pumpkin time” in German), almost everyone I know in Switzerland is making pumpkin soup, but I wanted to make something else that was just as savory and full of pumpkin flavor. This tart recipe was inspired from conversations I have had in the past few days with colleagues and friends about their favorite pumpkin/squash recipes. It was super easy to make since I used pre-made puff pastry and works perfectly for a Sunday brunch and paired with a salad, it makes for a great weeknight dinner. Let the Kürbiszeit continue!

Processed with VSCO with s2 presetProcessed with VSCO with s2 presetProcessed with VSCO with s2 presetProcessed with VSCO with s2 presetProcessed with VSCO with s2 presetProcessed with VSCO with s3 presetProcessed with VSCO with s3 presetProcessed with VSCO with s2 preset

INGREDIENTS: (serves 4-6)

1 lb. Kabocha Squash (225 g or 1/4 of a medium sized Kabocha squash)

1 L water for steaming

4 medium yellow onions

2 tbsp extra virgin olive oil

1/2 tsp salt (1.5 ml)

1 cup ricotta (250 g)

Salt & pepper to taste

1 puff pastry sheet (270 g, octagon/circular shape if available)

butter to grease tart dish

5-6 fresh sage leaves

1 egg

INSTRUCTIONS:

  1. Preheat oven to 395F (200C).
  2. Wash the Kabocha squash, cut into quarters and scoop the seeds out. Use one quarter (or a part equivalent to 1 lb.) and place onto a steamer basket in a large pot with 1 L of water. Place the lid onto the pot and steam for approx. 20 minutes or until fork tender and then set aside to cool.
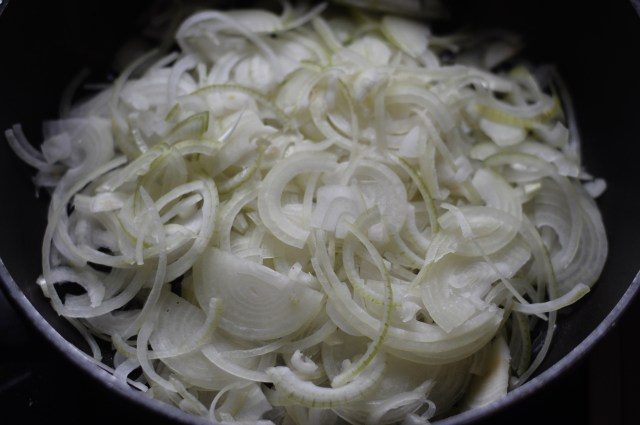
  3. While the squash is steaming, thinly slice 4 medium yellow onions.
  4. Heat 2 tbsp of extra virgin olive oil on high in a large frying pan and add in the sliced onions. Continue to cook the onions on medium-high heat and stir regularly. Season the onions with 1/2 tsp salt and cook the onions until a medium-brown (approx. 10-15 minutes). Set aside to cool.
  5. Season the ricotta with salt and pepper and mix well.
  6. Slice the cooked Kabocha squash into thin slices (the skin is tender so I kept it on).
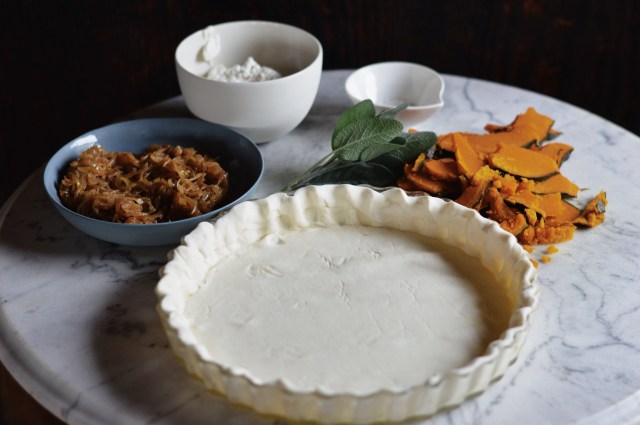
  7. Grease the tart dish with butter and place the puff pastry into the dish and press firmly into the frame while folding in the edges.
  8. Place the sliced Kabocha squash onto the puff pastry and distribute evenly. Season the squash with salt, pepper and a generous drizzle of extra virgin olive oil.
  9. Add the seasoned ricotta cheese and distribute evenly onto the squash.
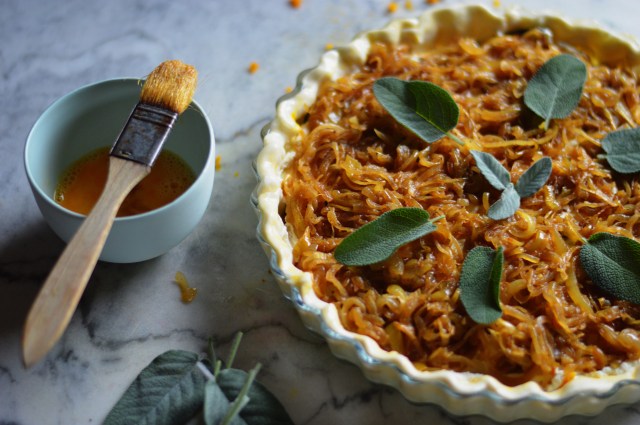
  10. Add the caramelized onions and distribute evenly.
  11. Garnish with a few sage leaves and brush the crust with egg wash.
  12. Bake for 30-35 minutes or until the crust is golden-brown.
  13. Remove from oven and allow the tart to cool for 5-10 minutes. It’s best to serve warm.


Pasta al Pomodoro

image2-91.JPG

Pasta al Pomodoro… In my opinion, this is one of the best comfort foods of ALL time. This dish is so simple, but utterly divine when made properly. And I use the word “properly” because I have to admit, I never knew how good this could taste before I met my husband and he made his version for me.

I know everyone has their own recipe for a pomodoro sauce and I’m sure every Italian mama has their own secrets and family recipe, but I have to be honest with you, my husband’s version is pretty damn good.

My husband always emphasizes 2 main points for this dish: (1) make sure you cook the onions slowly to ensure they are sweet once cooked through and (2) the “marriage” of the pasta and sauce is the most important finish to the dish.

I also love this dish because we always have the necessary ingredients on hand and it’s usually our “go-to” dinner when we have come back from a weekend away and there’s nothing else in the fridge, which is often!

Processed with VSCO with s2 presetProcessed with VSCO with s2 presetProcessed with VSCO with s3 presetimage1-120.JPGimage3-71.JPG

INGREDIENTS: (serves 4-5)

Extra-virgin olive oil

2 medium yellow onions, diced small 

3 cloves garlic, minced

2 anchovy filets (optional)

2-3 sprigs fresh rosemary

1/2 cup of dry white wine  (120ml, I usually use the Prosecco that I’m already drinking while cooking)

Pinch of sugar

Salt & pepper to taste

1 large can of whole or diced San Marzano tomatoes (28 oz. / 800g)

1 package (1 lb. / 500g) of Spaghetti, Linguini or any pasta of your choice

Salt for pasta

Grated Parmigiano-Reggiano

Fresh basil leaves or chopped Italian flat leaf parsley for garnish

DIRECTIONS:

  1. In a deep saute pan, heat a generous amount of extra-virgin olive oil (should coat the entire pan) on medium high and add the diced onions. Slowly cook the onions between medium and medium-high heat until they are transluscent. The key is to slowly cook the onions so they become sweet.
  2. Keep the heat on medium to medium-high and add in the garlic and the anchovy filets, which are optional. The anchovies will add umami to the sauce, but you won’t taste the actual anchovy taste at the end. The sauce will also taste great without them. Saute for about 1-2 minutes and stir frequently to prevent the garlic from burning and becoming bitter.
  3. Add the dry white wine and let it come to a boil for a minute or so.
  4. Add in the can of tomatoes and sprigs of rosemary. If you are using whole tomatoes, crush them with a spoon to break them apart.
  5. Add a pinch of sugar to the sauce, salt and pepper to taste and keep at a simmer to allow the sauce to reduce (20-25 minutes).
  6. Bring water to a boil in a large pot for the pasta. When the water comes to a boil, generously add salt (should taste like the sea) and add the pasta. Cook to al dente or even 1-2 minutes short of the cooking time on package.
  7. Remove rosemary sprigs from the sauce and when the olive oil starts to coat the perimeter of the pan, your sauce is ready and remove the pan from heat.
  8. Drain the pasta and reserve 1/4 cup of the pasta water.
  9. Add the reserved pasta water and pasta to the sauce. Mix well and make sure there is a “marriage” between the pasta and the sauce.
  10. Add a generous handful of grated Parmigiano to the pasta and a drizzle of good olive oil and mix.
  11. Serve and garnish with more freshly grated Parmigiano, freshly-cracked black pepper, a pinch of Fleur de Sel, and a fresh basil leaves or flat-leaf parsley.

Asparagus Ricotta Prosciutto Wild Garlic Pesto Baked Pastry Roll

image1-88.JPG

One of the joys about cooking seasonally is that there are certain dishes that you look forward to because you can only truly enjoy them a few times a year and at a specific time of year. This is one those dishes. I know as soon as spring rolls around and asparagus is in the markets at it’s prime seasonal time, my husband will make this delicious puff pastry filled with Asparagus, Ricotta and Landrauchschinken (Swiss version of Prosciutto). Luckily, I still had some wild garlic pesto on reserve and it pairs perfectly with this “spring roll”.

This dish is incredibly easy to make (since I don’t make my own puff pastry) and it’s fantastic to serve at a brunch or for dinner with a beautiful salad on the side. My husband also often makes one roll with the cured ham and then one with smoked salmon, which is equally as delicious. There are so many variations to this dish you can make, but the asaparagus is what really makes it.

Processed with VSCO with s3 presetProcessed with VSCO with s3 presetProcessed with VSCO with s3 presetProcessed with VSCO with s3 presetProcessed with VSCO with s3 presetProcessed with VSCO with s3 presetimage1-89Processed with VSCO with s2 presetimage3-51.JPGimage1-90.JPGimage3-52.JPGimage2-65.JPGimage1-91.JPGimage2-66.JPGimage1-92.JPGimage2-67.JPGProcessed with VSCO with s2 preset

INGREDIENTS (4-6 servings)

11 ounce puff pastry sheet in a rectangular shape (320 g Blätterteig in German)

2 bundles of thin asparagus (1.75 pounds or 800g)

1 cup whole-milk ricotta (250g)

8-10 slices of prosciutto (or Landrauchschinken, Swiss smoked cured ham)

1/4 cup of wild garlic pesto (optional)

1 egg yolk beated

1 tbsp vegetable stock (10 g; I prefer the Knorr brand)

2 cups water to cook asparagus (470 ml)

salt & pepper to taste

INSTRUCTIONS

  1. Preheat your oven the temperature indicated in the instructions of your puff pastry. I had my oven preheated to 390 F (200 C).
  2. Prepare your asparagus by breaking the bottom stems off or trimming them.
  3. In a large stock pot, add in 2 cups of water and bring to a boil. Add in the 1 tbsp vegetable stock to the boiling water and then add in the asparagus stems. Cover and cook for approx. 4 minutes or until tender.
  4. Season the ricotta with salt and freshly cracked pepper and mix well. Set aside.
  5. Drain the asaparagus stems and rinse with cold water to stop them from cooking longer.
  6. Take your puff pastry out of the refrigerator and roll it out on a baking pan lined with baking paper.
  7. Cut 3 strips length-wise and approx. 1/2 inch wide. Set these strips aside, which will be used for decoration (optional).
  8. Line the puff-pastry with the prosciutto slices, leaving room (about 1 inch) at the bottom of the pastry  and about 1 inch on the right and left sides.
  9. Place the asparagus stems evenly on top of the prosciutto slices (parallel to the longer side of the puff pastry).
  10. Top the asparagus with the ricotta and then add a layer of the wild garlic pesto if you would like.
  11. Fold the top half of the puff pastry over the filling and brush the egg wash on the bottom part of the puff pastry.
  12. Bring the bottom part of the puff pastry over the top half as to close the roll.
  13. With a fork, gently press the ends together to close the top part of the roll.
  14. Fold the ends in and gently press with a fork to close both ends.
  15. Brush the entire top of the pastry roll with the egg wash.
  16. Decorate the top of the pastry roll with the 3 pastry strips.
  17. Take a fork and poke the top of the pastry roll a few times on top to allow the steam to exit.
  18. Place in the oven for approx. 30-35 minutes or until beautifully brown and crispy.
  19. Allow the roll to rest for a few minutes before slicing and serving.


Andre’s Roasted Chicken & Vegetables

Processed with VSCOcam with s2 preset

This is a recipe I have been wanting to share for over 5 years and it is one of the reasons I started a cooking blog. This dish is a bit nostalgic for me because the night I met my husband-to-be, he made a whole roasted chicken over an open fire and because we had quite a bit of wine leading up to the main course, the chicken was a bit under cooked and he still talks about it with embarassment. And it really is one of the ONLY times he has not cooked a dish perfectly.

Roasted chicken is one of those dishes I have found to be so simple and when cooked properly, it’s one of the best meals one can have and you never get sick of. HOWEVER, it’s also one of those dishes that can easily be over cooked and the meat can very well be dry. My husband’s roasted chicken recipe is something I am very excited to share because it is very easy to make and you will always end up with a chicken that is juicy and moist in the inside and crispy on the outside, which is the perfect and only acceptable version of a roasted chicken, in my opinion. His method as you will see is using vegetable broth on the bottom of the pan to steam the chicken ensuring the moistness of the meat and at the same time, giving the chicken and the vegetables flavor. I also love this dish because you can always change up the spices, herbs and vegetables and it’s something you can eat on a regular basis.

Here is Andre’s recipe for a roasted chicken and vegetables.

Processed with VSCOcam with s2 preset

Processed with VSCOcam with s2 preset

Processed with VSCOcam with s2 preset

Processed with VSCOcam with s2 preset

Processed with VSCOcam with s2 preset

Processed with VSCOcam with s2 preset

image2-32.JPG

Processed with VSCOcam with s2 preset

Processed with VSCOcam with k3 preset

Processed with VSCOcam with k3 preset

Processed with VSCOcam with k3 preset

Processed with VSCOcam with s2 preset

image1-47.JPG

INGREDIENTS (approx. 4 servings)

For the chicken marinade:

3 lb. free-range whole chicken

1/2 cup extra virgin olive oil

juice of 1/2 lemon

1 tbsp herb salt (or can sub with kosher salt coarse sea salt)

freshly cracked black pepper (to taste)

5 garlic cloves smashed

handful of fresh thyme sprigs

slice the other 1/2 of a fresh lemon into 3-4 thin slices

For the roasted vegetables:

2 tbsp extra virgin olive oil

1 large white onion roughly chopped (I used 2 medium sized ones since my grocery store fails to stock large ones)

5 carrots roughly chopped

1 fennel bulb roughly chopped

3 sweet potatoes roughly chopped

1 yellow bell pepper roughly chopped

handful of green beans

handful of cherry tomatoes (I like to keep the stems on)

2-3 sprigs of fresh rosemary

2 tbsp vegetable seasoned broth (I prefer Knorr)

4 cups boiling water


INSTRUCTIONS

  1. Butterfly your whole chicken by placing your chicken breast-side down on a cutting board. Working from the cavity opening at the neck, cut down the middle of the back-bone with a pair of kitchen shears all the way to the other end of the chicken. I don’t cut the back-bone out, but you can if you would like.
  2. Clean your chicken in cold water getting rid of any excrements in the inside. I also like to cut off any excess skin, the neck bone and the tips of the wings since they aren’t edible.
  3. Place your chicken in a baking dish or any deep dish that you can fully lay out your chicken. Drizzle a 1/2 cup of extra virgin olive oil over your chicken and the juice of 1/2 a fresh lemon. Then sprinkle a 1/2 tbsp of herb salt or kosher salt on the breast side of your chicken, making sure to distribute evenly. Then season this side with freshly cracked black pepper generously.
  4. Turn your chicken over so the cavity is exposed and sprinkle another 1/2 tbsp of herb salt or kosher salt making sure to distribute evenly. Then season this side with freshly cracked pepper generously.
  5. Add in the 5 smashed cloves of garlic, the fresh thyme sprigs and the slices of the other half of your fresh lemon.
  6. Massage your chicken to ensure the whole chicken is well seasoned.
  7. Wrap the dish with your chicken in plastic wrap and marinate for at least 4 hours and up to 24 hours in the refrigerator.
  8. Clean, peel and roughly chop your choice of vegetables. Just try to keep in mind the cooking times of your veggies and cut them accordingly, but I generally just roughly chop them as pictured.
  9. Preheat your oven to 475 F (250 C) and take your chicken out of the refrigerator.
  10. In a large frying pan, heat on high and add in approx. 2 tbsp of extra virgin olive oil. Add in your chopped onions and then each vegetable one at a time (I start with onions and then add in the vegetables with the most cooking time first because you want to keep the frying pan hot to brown the vegetables).
  11. Mix 2 tbsp of vegetable broth with 4 cups of boiling water and mix well.
  12. Saute your vegetables for about 5-7 minutes or until a bit browned and then add in your vegetable broth and saute for another 2-3 minutes.
  13. Pour your vegetables and the broth onto a baking pan or baking dish, making sure to distribute an even layer.
  14. Take your marinated chicken and place it on top of the vegetables butterflied down (breast side facing up) and your rosemary springs underneath your chicken (to prevent burning, I also like to make sure the smashed garlic cloves are not on top of the chicken as not to become bitter).
  15. Place this in the oven at 475 F (250 C) for 45 minutes (make sure the heat is on up top and on the bottom).
  16. Every 15 minutes, take some broth from the bottom of the pan and pour it on top of the chicken to keep moist.
  17. After baking for 45 minutes, turn your oven on grill for approx. 5-7 minutes. This may vary from oven to oven, so keep your eye on your chicken to make sure it is not burned but grilled to a beautiful golden-dark brown.


NOTES

  • Please keep in mind that the chickens in Switzerland tend to be smaller in size than in the U.S. and cooking times may vary depending on the size and the oven. When in doubt, before you turn your oven on grill, you can check your meat to make sure it’s cooked all the way through and if necessary, bake the chicken a bit longer. If it is cooked through, turn your oven on grill.
  • Make sure to season your chicken well. The key to this dish is to overseason a bit than you are normally used to with meat.
  • If you don’t have herb salt, you can also mix regular kosher salt and Old Bay is one of my favorites for this dish.

Swiss Raclette

Processed with VSCOcam with a6 preset

One of my favorite meals during the winter time is Raclette, which of course was one of the meals we enjoyed during our NYE trip to the French Alps. And when you are in a cozy chalet in the mountains or anywhere else that is cold, this dish is an absolute must and it’s a fantastic meal to share with a large group. And for me personally, I prefer Raclette a hundred times over fondue, but that’s just me.

So what is Raclette? Raclette is a semi-firm cow’s milk cheese that is typically served melted over boiled potatoes and is traditionally found in the Swiss and French Alps during the cold months. The name is derived from the French word racler, which means “to scrape”. Raclette cheese is either melted over an open fire, or with a special grill that melts the cheese directly from the wheel, or most commonly on a special Raclette table top grill. Now the key to a good Raclette is of course the cheese and secondary are the side condiments.

My husband and I prefer a non-pasteurized Raclette because it tends to melt more smoothly. We also ALWAYS buy our cheese from a local cheesemaker,  Dorfkäserei Küssnacht, in the town of Küssnacht am Rigi. Their Raclette is just the best and surprisingly cheaper than the average Raclette you find in the normal Swiss grocery stores.

Processed with VSCOcam with s2 preset

Now let’s talk about the sides and condiments for Raclette. As mentioned before, Raclette is typically melted over boiled potatoes. The Swiss typically use Amandine or Charlotte potatoes, which are smaller in size and still stay relatively firm when fully cooked (you don’t want mushy potatoes). Raclette is also traditionally served with anything pickled on the side, such as cornichons, pearl onions and baby corn. For our Raclette dinner, we were fortunate enough to include homemade curried pickled squash made by my brother-in-law and pickled tomatoes made by the uncle of my Polish colleague into the mix of our pickled sides. And for seasonings, try freshly ground nutmeg, freshly cracked black pepper, curry spice mix, piri piri or your favorite smoked chili.

Processed with VSCOcam with s2 preset

I hope these pictures inspire some of you to enjoy a Raclette dinner in your homes during these cold months. And please know that everyone has different preferred sides and condiments and you can try whatever you think tastes good with melted cheese, even curry ketchup. And try pairing your Raclette with a nice crisp white wine like a Fendant. For those in the Luzern area, try the Solaris white wine from the organic winery Sitenrain in Meggen. It is absolutely delicious!

Processed with VSCOcam with a6 presetimage2-25.JPGimage1-37.JPGProcessed with VSCOcam with s2 presetimage1-34Processed with VSCOcam with s2 presetProcessed with VSCOcam with a6 presetProcessed with VSCOcam with s2 presetProcessed with VSCOcam with a6 preset

INGREDIENTS (4-6 servings)

Raclette cheese: 7-14 ounces per person / 200-400 grams per person

Boiled Raclette potatoes (Charlotte or New Potatoes work great): 1/2 pound per person / 250 grams per person on average

1 jar of cornichons or your favorite pickles

Other pickled sides such as pickled pearl onions, pickled hot peppers, etc.

2 large onions thinly sliced to melt with your cheese

1/4 pounds or 125 grams of thinly sliced smoked bacon to melt with your cheese

Freshly ground nutmeg

Freshly cracked black pepper

Hot pepper flakes or piri piri


INSTRUCTIONS (for a table top Raclette grill)

  1. Boil your potatoes in salted water until well cooked.
  2. Slice your Raclette into approx. 0.4 inches / 1 cm slices or a size appropriate for your Raclette pans and place them on large platter.
  3. Thinly slice 2 large onions and place into a small bowl or two for the table.
  4. Thinly slice the smoked bacon and place into a small bowl or two for the table.
  5. Place all of your preferred pickled sides and spices onto the table around the Raclette table top grill.
  6. Once your potatoes are fully cooked, drain the water and place them into a bowl covered by a kitchen towel to stay warm.
  7. Turn on your Raclette grill and start melting some cheese!


Korean New Year’s Day Soup (Duk Mandu Gook)

image1-22.JPG

One of my life regrets is that I never learned how to speak Korean, especially knowing that I could truly have been bilingual having grown up in America and in a Korean immigrant family. Only speaking one language has even felt more like a handicap now that I live in Europe. For example, I work in an office of about 100 people and I among the other 7 Americans and Brits are probably the only ones who don’t speak a second or third language fluently. Embarrassing? Yes.

I do however feel proud that I can cook Korean food. When I was growing up, I always hung out in the kitchen with my mom as a way to get out of practicing the violin or piano (I know, super Korean). I would always ask to help season soups, peel garlic, assemble mandu (Korean dumplings) or even take the stems off bushels of soy bean sprouts. Looking back now, I am very thankful to have spent so much time with my mom in the kitchen because cooking Korean food has become something natural to me and of course I get to enjoy a meal that’s absolutely delicious and always brings me back home.

I know it’s already 5 days past New Year’s Day, but I had to make this because I’ve been eating this soup almost every start of the new year since I was born. And to be honest, I didn’t make this on the 1st because frankly, it’s a lot of work and was not in any condition to be working in the kitchen most of the day, but I tell you it’s worth it! And of course, this soup can be enjoyed anytime of the year, but it is most traditionally served on New Year’s Day in Korea to honor becoming a year older. I hope you enjoy this recipe and share it with your loved ones!

Oh and I just realized as I was writing this blog post that I forgot the roasted seaweed as a garnish, but it’s still delicious without it!

Continue reading “Korean New Year’s Day Soup (Duk Mandu Gook)”