Coconut Milk Panna Cotta w/Sea Salted Caramel Popcorn

image2-47.JPG

I have to admit that I am not much of a baker or a dessert maker. I think it probably has to do with the fact that I prefer salty snacks over sweet ones. Of course that doesn’t mean I don’t enjoy a tasty sweet regularly or ever say no to someone offering dessert and I definitely never decline when it’s my dear friend Jenn doing the offering.

Jenn is not only a very close friend of mine, but she is also one of the most talented bakers I know. Everything she bakes, whether it’s cookies, a cake, cupcakes, pie or anything sweet for that matter, is heavenly AND always so beautiful. She even made our wedding cake and it was divine!

Several months ago, Jenn and I attended a potluck dinner and she brought these beautiful panna cottas topped with salted caramel and caramel popcorn. Genius, right? I am not much of a caramel fan (I know it’s disappointing), but when I saw these beauties, I had to have one and it was just as good as it sounds. I am so happy to finally share Jenn’s recipe for this Coconut Milk Panna Cotta topped with Caramel Popcorn because it is not only super delicious but super easy to make. AND her Coconut Milk Panna Cotta recipe is very versatile because you can top it with so many different things such as fresh fruit, fruit coulis, candied nuts, whipped cream, etc. So enjoy and get creative!

image3-38.JPGimage2-48.JPGimage1-66.JPGimage2-49.JPGProcessed with VSCOcam with s2 presetProcessed with VSCOcam with s2 presetimage2-51.JPGimage1-67.JPGProcessed with VSCOcam with s2 presetProcessed with VSCOcam with s2 presetimage1-68.JPG


INGREDIENTS (8 servings)

2 cups coconut milk (500 ml)

2 cups heavy cream (5oo ml)

1/4 cup white granulated sugar (30 g)

1 vanilla bean

5 gelatin sheets

For the caramel popcorn:

1 cup popcorn kernels (100 g)

1/4 cup vegetable oil (50 g)

1/2 cup white granulated sugar (60 g)

4 tbsp unsalted butter (55 g)

1/2 cup heavy cream (125 ml)

pinch of sea salt

INSTRUCTIONS

  1. Place the 5 gelatin sheets in a bowl of cold water so they are fully immersed and let soak for 5 minutes or so.
  2. In a medium saucepan, add 2 cups coconut milk, 2 cups heavy cream, and 1/4 cup sugar and heat on medium high.
  3. Cut open the vanilla bean and scrape the seeds out and place this and the whole vanilla bean pod in the saucepan mixture. Stir milk mixture.
  4. Wring out the gelatin sheets to remove any excess water and add to the milk mixture.
  5. Whisk the milk mixture on medium high heat for 4-5 minutes or until the sugar and gelatin sheets have dissolved.
  6. Discard the vanilla bean pod and pour the warm mixture into 8 dessert glasses or silicone muffin cups.
  7. Place the glasses into the refrigerator for at least 5 hours or until firmly set.
  8. In a large pot (I prefer to use a cast iron pot), add in 1/4 cup vegetable oil or enough oil to generously cover the bottom of the pan and 1 cup popcorn kernels. Place the pot with the lid on high heat. Once the popcorn kernels have come to a slow pop, take the popcorn off the heat and set aside.
  9. Preheat oven to 250 degrees F (95 degrees C).
  10. For the caramel sauce, place 1/2 cup sugar in a medium saucepan and melt the sugar over medium heat, stirring constantly as not to burn the sugar.
  11. Once the sugar is completely melted, add in the butter, stirring constantly for a few minutes.
  12. Then slowly pour in the heavy cream, stirring constantly. Allow this to come to a boil for about 1 minute while stirring. Watch out as mixture might bubble and pop.
  13. Take the saucepan off the heat and add a pinch of sea salt and mix well.
  14. In a large bowl, add in a generous amount of popcorn and drizzle caramel sauce over the popcorn. Add in more popcorn and caramel sauce until well covered.
  15. On a baking sheet lined with baking paper, spread an even layer of the caramel popcorn and then sprinkle with more sea salt.
  16. Place in the oven for 1 hour, turning the popcorn every 15 minutes and then allow to cool for at least 30 minutes before topping the panna cotta.
  17. When the panna cotta has set, top each portion with a generous amount of caramel popcorn and serve.


NOTES

  • I used glasses to set my panna cottas as I didn’t want to have to worry about flipping them out onto dishes, which makes the silicon muffin cups extremely useful.
  • You can also substitute whole milk for the heavy cream if you would like as the taste will still be delicious.


Acai Bowl with Coconut & Cashew Heaven Nut Butter

Processed with VSCOcam with s3 preset

I am thrilled to have the opportunity to partner with Chia Charge Switzerland in developing recipes using their delicious Coconut & Cashew Heaven Nut Butter. The first idea that came to mind was the superfood powered Acai Bowl because I happen to make this the day I was having guests over and one of my friends was on the Paleo diet. What I made for breakfast that day, I also served as a dessert, which worked wonderfully.

I made my own version of the Acai Bowl using agave syrup, coconut water, acai powder and of course Chia Charge’s Coconut & Cashew Heaven. Now, I know there’s a debate over whether or not agave syrup is certified Paleo, but we will go with the consensus that it is “Paleo-friendly”.

Check out the other tasty and healthy products from Chia Charge Switerland. They even have a Chiaocolate Pudding Nut Butter made from brazil nuts, agave syrup and maldon sea salt flakes. Yum!

image2-46.JPGProcessed with VSCOcam with hb2 presetProcessed with VSCOcam with s2 presetimage1-63.JPG

INGREDIENTS (approx. 4 servings)

2 cups frozen mixed berries (450 g – I used a mixture of blackberries, raspberries and blueberries)

2 frozen sliced bananas

2 tbsp acai powder (25 g)

2 cups unsweetened coconut water (470 ml)

3 tbsp Chia Charge Coconut & Cashew Heaven Nut Butter (45 g)

1 tbsp agave syrup (20 g)

For toppings:

fresh fruit (I used mango, pomegranate and kiwi)

unsweetend coconut shavings

sliced raw almonds

INSTRUCTIONS

  • Place the frozen berries, frozen banana slices, acai powder, coconut water, nut butter and agave syurp and blend until smooth. The consistency should be a very thick smoothie, but still easy to pour.
  • Pour the mixture into individual bowls and add your choice of toppings


NOTES

  • When your bananas are super ripe and a bit too mushy to eat anymore, slice them up and place in the freezer. This is a great way not to waste over-ripened bananas and you don’t need to add in ice to your smoothies. Also, it prevents me from making so much banana bread.


Korean Mungbean Pancakes (Bindaetteok)

image3-33.JPG

If there’s one recipe I’m most proud of having learned from my mother, it’s definitely her Korean Mungbean Pancakes (Bindaetteok). My mom is one of the best cooks I know because when she cooks for people, she is so incredibly selfless and her food is genuinely made with love. If someone were to ask me what her best dish is, it’s her Bindaetteok, hands down.

Bindaetteok is a savory pancake made from dried mung beans, which are soaked in water then blended and mixed with vegetables and ground pork. This dish dates back to the late 1600s and originates from the northern part of Korea, which is where my mother’s side of the family comes from (pre-war) and are traditionally made on a full moon.

I think everytime my mom makes these pancakes, it brings back fond memories of her childhood. My mother grew up in Seoul with 6 siblings and 3 boy cousins who lived next door and she used to tell me how she remembers making these pancakes outside on a large iron skillet over an open fire, where she and her sisters and mother would always make a huge batch of Bindaetteok. They even had to grind the beans by hand using a stone grinder. And because during her childhood meat was expensive and hard to come by, they would make these pancakes with just vegetables and fry them in lard.

Until this day, my mom still only makes these pancakes on a full moon day and in celebration of the lunar new year tomorrow, I would like to share this very special dish with you that is very close to my family and to my heart.

Processed with VSCOcam with s2 presetimage1-54.JPGProcessed with VSCOcam with s2 presetProcessed with VSCOcam with s2 presetProcessed with VSCOcam with s2 presetimage2-40.JPGimage1-56.JPGimage1-57.JPGimage2-41.JPGimage2-42.JPGimage3-34.JPGimage1-58.JPGimage2-43.JPGimage3-35.JPGProcessed with VSCOcam with s2 presetProcessed with VSCOcam with s2 presetimage1-59.JPGimage2-44.JPGimage1-60.JPG


INGREDIENTS (approx. 5 dozen pancakes)

42 ounces dried mung beans (1.2 kg)

cold water for soaking mung beans

2 lb. good quality ground pork (900 g)

1 medium size head of Napa cabbage thinly chopped (800 g)

3 cups fresh mung bean sprouts (100 g)

3-4 scallions bunches sliced diagnolly (100 g)

1 large white onion sliced thinly (I used 2 small ones)

4 garlic cloves minced

1 inch ginger piece grated (2.5 cm)

2 tsp salt (11.5 g)

4 tbsp sesame oil (55 g)

freshly cracked black pepper

extra salt for batter mixture

vegetable oil for frying

For Dipping Sauce

1/2 cup soy sauce (150 g)

1.5 tbsp rice wine vinegar (25 g)

2 tbsp mirin (30 g)

freshly cracked black pepper

chopped scallions for garnch

a dash of Korean dry crushed red pepper (optional)


INSTRUCTIONS

  1. Pour the dry mung beans in a large colander and rinse in cold water for a few minutes.
  2. Place the mung beans in a large bowl and cover with cold water until the beans are fully immersed in water with at least 1 inch of water above the beans. Cover and soak them overnight at room temperature.
  3. Thinly chop the head of Napa cabbage and place in a large pot along with all of the fresh mung bean sprouts. Fill the pot with cold water until at least 1/2 of the vegetables are immersed in water. Boil for 3-4 minutes.
  4. Drain the cooked Napa cabbage and mung bean sprouts and rinse with cold water. Squeeze all excess water out of the vegetables and place them in a large mixing bowl.
  5. Add in the ground pork, thinly sliced white onions, sliced scallions, minced garlic, grated ginger, salt, sesame oil and freshly cracked black pepper. Mix well with your hands.
  6. Let the pork-vegetable mixture marinate overnight or for at least 2-3 hours in the refrigerator.
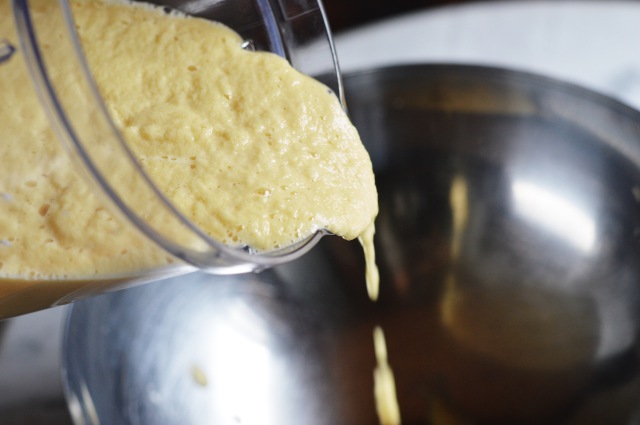
  7. To prepare the pancake batter, do not drain your soaked mung beans. Place 5 cups of the water soaked mung beans (just scoop generously from the middle of the bowl) in a blender and blend on high for about 1 minute or unil the mixture is smooth.
  8. Place the batter in a large mixing bowl and add 2 cups of the meat filling along with 1 tsp salt. Mix well.
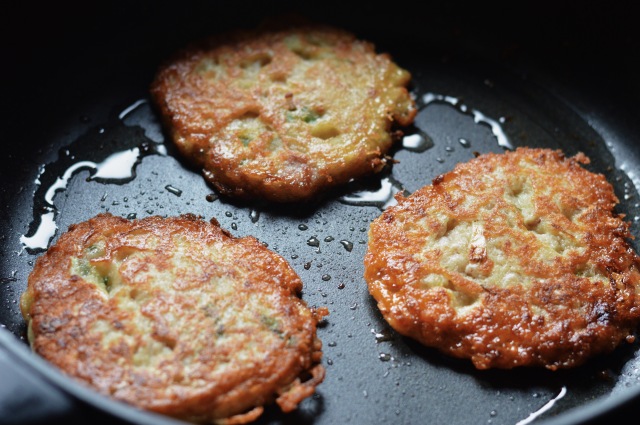
  9. Turn your frying pan on high and add a generous amount of vegetable oil. When your pan is piping hot, pour approx. 1/4 cup of your pancake batter into the pan for each pancake. I was able to fit 3 pancakes at one time.
  10. Take a spoon and smooth out the pancake batter to make a nice circular and even shape.
  11. Once the bottom of the pancakes are golden brown, flip over and cook the other side until golden brown. I like to add a little bit more vegetable oil after I flip my pancakes to ensure each side is nice and crispy.
  12. Place the pancakes on a large plate lined with paper towels to soak up the excess oil.
  13. Mix the ingredients for your dipping sauce in a bowl and serve with the hot pancakes.


NOTES

  • You can store these pancakes in the freezer if well packed for up to 3 months.


Hummus with Zatar

Processed with VSCOcam with s2 preset

I first tasted my friend Aviva’s hummus over our New Year’s trip and I have to say that it is the best hummus I have ever had. Something about the creaminess and the kick of garlic makes this sensational.

I met Aviva just last May through a mutual friend in the U.S. and we bonded instantly over our love of food and cooking. In the last couple of weeks, I have had many opportunities to cook with her and what I love about Aviva is that she always cooks meals and dishes with 150% enthusiasm and effort AND her food is delicious.

I recently saw an episode of “The Mind of a Chef” when David Chang eats at the yakitori restaurant, Bird Land, in Tokyo. I remember the chef saying, “you cannot betray what they expect, but you have to go above it in some way too.” This resonates with me in how Aviva cooks because when she cooks a dish, she wants to make sure that it’s the best and she will take all the time to do it without shortcuts.

I am in no way trying to compare ourselves to a Michelin-starred chef, but I do believe and know that when you cook with so much effort and love, this does translate in your food. Well, as long as you CAN cook, that is…

After 2 coaching sessions, here is Aviva’s hummus recipe.

Processed with VSCOcam with s2 presetProcessed with VSCOcam with s2 presetProcessed with VSCOcam with s2 presetimage1-52.JPGProcessed with VSCOcam with c1 presetProcessed with VSCOcam with c1 presetProcessed with VSCOcam with s2 preset

INGREDIENTS

4 cups (500 g) dry chickpeas

water to soak & cook chickpeas

1 1/4 cups (295 ml) water

3/4 cup (180 g) tahini

6 tbsp (87 g) extra virgin olive oil

3 tsp (17 g) salt

2 lemons, cut into segments

6-7 cloves of garlic

For Garnish:

zatar (optional)

premium extra virgin olive oil (optional)


INSTRUCTIONS

  1. Place your dry chickpeas in a large bowl or pot and fill with cold water until the chickpeas are fully immersed in water with at least 1-2 inches of water above the peas. Cover and soak them overnight at room temperature.
  2. Drain the chickpeas and place them in a medium-size pot and fill with water again until the chickpeas are fully immersed in water with about 1 inch of water above the peas. Bring the peas to a boil and continue to boil at a medium-high heat for approximately 25-30 minutes or until well-cooked (this may vary depending on the brand of chickpeas so taste to see if they are tender after at least 20 minutes).
  3. When the chickpeas are fully cooked and tender, drain them, rinse with cold water and let them cool to room temperature.
  4. Place the cooked chickpeas into a large food processor (if you have a smaller one, you can work in 2 batches) along with 3/4 cup of water, 3/4 cup tahini, 6 tbsp extra virgin olive oil, 3 tsp salt, lemon segments and garlic cloves. Pulse on a high speed until all ingredients are well blended. It will take several minutes for the chickpeas to become well blended.
  5. Check the consistency of your hummus and add in the remaining water in a 1/4 cup at a time as chickpeas can vary in how much water they absorb during the soaking process. If needed, add in more water to your liking of consistency.
  6. Garnish with zatar and a generous drizzle of premium extra virgin olive oil and serve with your choice of fresh vegetables.


NOTES

  • This hummus is extra good with kohlrabi sticks, which is a vegetable I only became familiar with when I moved to Switzerland. Another name for kohlrabi is German cabbage and it’s crunchy, sweet and delicious. Apparently, it’s Heidi Klum’s favorite snack.