Morrocan Carrot Dip w/Feta, Kalamata Olives & Capers

Processed with VSCOcam with s2 preset

This past weekend, we celebrated my husband and his twin sister’s birthday along with my beautiful mother-in-law and a couple of dear friends in Basel. Since I moved to Switzerland over 6 years ago, visiting my sister-in-law has always been a special treat for me and has become a bit of a monthly ritual. We always arrive on a Saturday afternoon and everytime we walk into her house, we are always greeted with so much love, the most beautiful flower arrangements and of course wonderful food, wine and company. What makes these weekends even extra special is that we spend most of our time in the kitchen, where we always cook together, enjoy delicious food and simply have a great time together. And on Sundays, our routine is to start off with a homemade brunch that always includes soft-boiled eggs since my sister-in-law is the master and then a Sunday stroll to the zoo or a museum.

image2-55.JPG

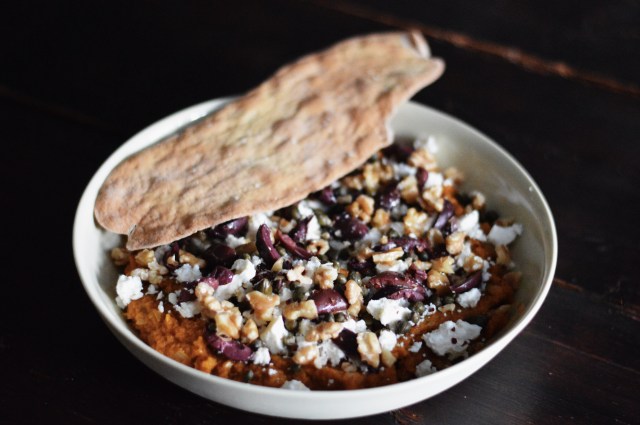
I decided to make this Morrocan-inspired Carrot dip for this occasion because of course, there is always an apero to start the evening and I was just recently introduced to this dish a few weeks ago when we were invited to some friends’ house for dinner. This dip was so good that I have made my own version of it 3 times in the last 3 weeks… This recipe is very easy and the combination of carrots, cumin and feta is just delicious!

Processed with VSCOcam with s2 presetProcessed with VSCOcam with s2 presetProcessed with VSCOcam with s2 presetProcessed with VSCOcam with s2 presetProcessed with VSCOcam with s2 presetimage1-71.JPGProcessed with VSCOcam with s2 presetProcessed with VSCOcam with s2 presetProcessed with VSCOcam with s2 preset

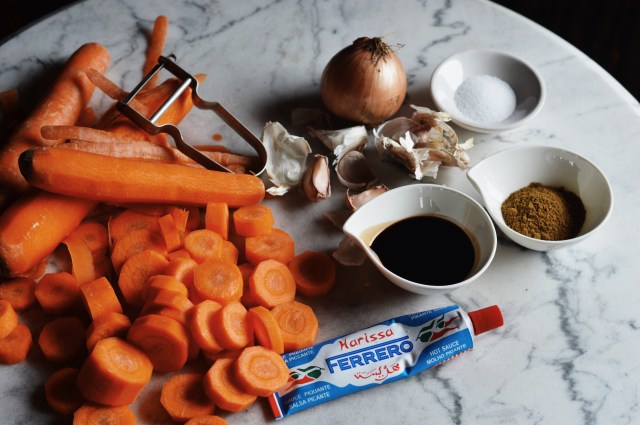
INGREDIENTS (approx. 6 servings)

6-7 carrots

1 medium-sized white onion

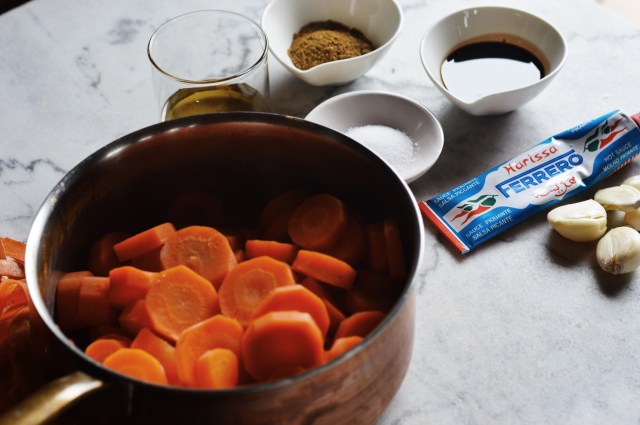
2 tbsp (30 ml) plus 1/4 cup (60 ml) extra virgin olive oil

6 garlic cloves

1 tsp (6 g)  salt

2 tbsp (30 ml) balsamic vinegar

1 tbsp (6 g) ground cumin

1 squirt of harissa (optional and more/less to your heat liking)

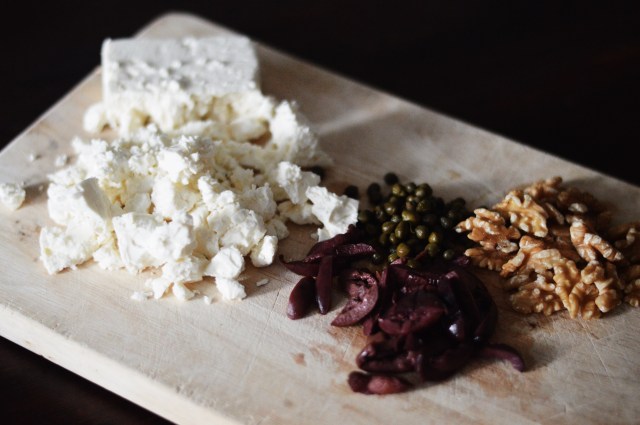
1 packet of good feta cheese (7 oz. or 200g; break into crumbled pieces with your hands)

handful of Kalamata olives (pitted and sliced)

small handful of capers

small handful of chopped raw walnuts

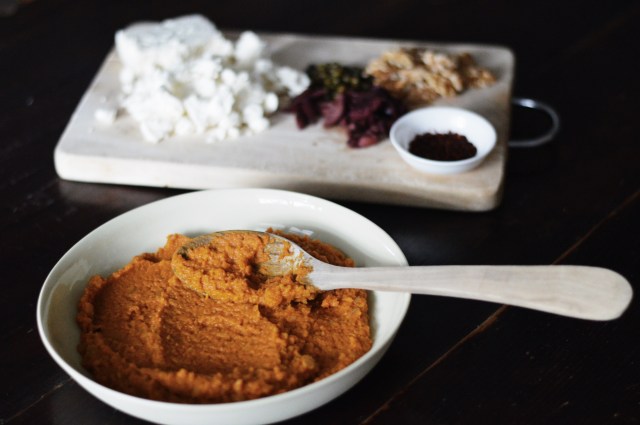
a sprinkle of Pul Biber (optional or you can add normal crushed red pepper flakes)

INSTRUCTIONS

  1. Peel 6-7 carrots and slice them approx. 1/4 inch thick.
  2. Place sliced carrots in a medium-sized saucepan and add water until all the carrots are fully covered. Boil until the carrots are tender (15 minutes or so).
  3. Finely chop the white onion and saute in 2 tsbp olive oil on medium-high until transluscent. Add in 3 chopped garlic cloves and stir for about 30 seconds and then set aside.
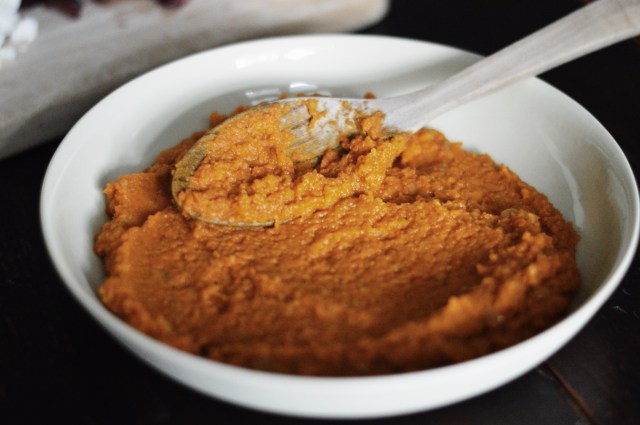
  4. Once the carrots are tender, drain the water and place carrots into a food processor. Add in the sauteed onion and garlic, 1/4 cup olive oil, salt, balsamic vinegar, ground cumin, harissa and 3 remaining whole garlic cloves. Blend on high until the mixture is silky and smooth.
  5. Spread the carrot puree onto a platter and top with crumbled feta, sliced kalamata olives, capers and walnuts. Sprinkle some Pul Biber on top and a last drizzle of good quality extra virgin olive oil.
  6. Serve with crackers, flat bread, baguette slices, or pita bread slices.


NOTES

  • Buy good quality feta cheese and I prefer to buy the block of feta and then hand crumble it myself.

Coconut Milk Panna Cotta w/Sea Salted Caramel Popcorn

image2-47.JPG

I have to admit that I am not much of a baker or a dessert maker. I think it probably has to do with the fact that I prefer salty snacks over sweet ones. Of course that doesn’t mean I don’t enjoy a tasty sweet regularly or ever say no to someone offering dessert and I definitely never decline when it’s my dear friend Jenn doing the offering.

Jenn is not only a very close friend of mine, but she is also one of the most talented bakers I know. Everything she bakes, whether it’s cookies, a cake, cupcakes, pie or anything sweet for that matter, is heavenly AND always so beautiful. She even made our wedding cake and it was divine!

Several months ago, Jenn and I attended a potluck dinner and she brought these beautiful panna cottas topped with salted caramel and caramel popcorn. Genius, right? I am not much of a caramel fan (I know it’s disappointing), but when I saw these beauties, I had to have one and it was just as good as it sounds. I am so happy to finally share Jenn’s recipe for this Coconut Milk Panna Cotta topped with Caramel Popcorn because it is not only super delicious but super easy to make. AND her Coconut Milk Panna Cotta recipe is very versatile because you can top it with so many different things such as fresh fruit, fruit coulis, candied nuts, whipped cream, etc. So enjoy and get creative!

image3-38.JPGimage2-48.JPGimage1-66.JPGimage2-49.JPGProcessed with VSCOcam with s2 presetProcessed with VSCOcam with s2 presetimage2-51.JPGimage1-67.JPGProcessed with VSCOcam with s2 presetProcessed with VSCOcam with s2 presetimage1-68.JPG


INGREDIENTS (8 servings)

2 cups coconut milk (500 ml)

2 cups heavy cream (5oo ml)

1/4 cup white granulated sugar (30 g)

1 vanilla bean

5 gelatin sheets

For the caramel popcorn:

1 cup popcorn kernels (100 g)

1/4 cup vegetable oil (50 g)

1/2 cup white granulated sugar (60 g)

4 tbsp unsalted butter (55 g)

1/2 cup heavy cream (125 ml)

pinch of sea salt

INSTRUCTIONS

  1. Place the 5 gelatin sheets in a bowl of cold water so they are fully immersed and let soak for 5 minutes or so.
  2. In a medium saucepan, add 2 cups coconut milk, 2 cups heavy cream, and 1/4 cup sugar and heat on medium high.
  3. Cut open the vanilla bean and scrape the seeds out and place this and the whole vanilla bean pod in the saucepan mixture. Stir milk mixture.
  4. Wring out the gelatin sheets to remove any excess water and add to the milk mixture.
  5. Whisk the milk mixture on medium high heat for 4-5 minutes or until the sugar and gelatin sheets have dissolved.
  6. Discard the vanilla bean pod and pour the warm mixture into 8 dessert glasses or silicone muffin cups.
  7. Place the glasses into the refrigerator for at least 5 hours or until firmly set.
  8. In a large pot (I prefer to use a cast iron pot), add in 1/4 cup vegetable oil or enough oil to generously cover the bottom of the pan and 1 cup popcorn kernels. Place the pot with the lid on high heat. Once the popcorn kernels have come to a slow pop, take the popcorn off the heat and set aside.
  9. Preheat oven to 250 degrees F (95 degrees C).
  10. For the caramel sauce, place 1/2 cup sugar in a medium saucepan and melt the sugar over medium heat, stirring constantly as not to burn the sugar.
  11. Once the sugar is completely melted, add in the butter, stirring constantly for a few minutes.
  12. Then slowly pour in the heavy cream, stirring constantly. Allow this to come to a boil for about 1 minute while stirring. Watch out as mixture might bubble and pop.
  13. Take the saucepan off the heat and add a pinch of sea salt and mix well.
  14. In a large bowl, add in a generous amount of popcorn and drizzle caramel sauce over the popcorn. Add in more popcorn and caramel sauce until well covered.
  15. On a baking sheet lined with baking paper, spread an even layer of the caramel popcorn and then sprinkle with more sea salt.
  16. Place in the oven for 1 hour, turning the popcorn every 15 minutes and then allow to cool for at least 30 minutes before topping the panna cotta.
  17. When the panna cotta has set, top each portion with a generous amount of caramel popcorn and serve.


NOTES

  • I used glasses to set my panna cottas as I didn’t want to have to worry about flipping them out onto dishes, which makes the silicon muffin cups extremely useful.
  • You can also substitute whole milk for the heavy cream if you would like as the taste will still be delicious.


Acai Bowl with Coconut & Cashew Heaven Nut Butter

Processed with VSCOcam with s3 preset

I am thrilled to have the opportunity to partner with Chia Charge Switzerland in developing recipes using their delicious Coconut & Cashew Heaven Nut Butter. The first idea that came to mind was the superfood powered Acai Bowl because I happen to make this the day I was having guests over and one of my friends was on the Paleo diet. What I made for breakfast that day, I also served as a dessert, which worked wonderfully.

I made my own version of the Acai Bowl using agave syrup, coconut water, acai powder and of course Chia Charge’s Coconut & Cashew Heaven. Now, I know there’s a debate over whether or not agave syrup is certified Paleo, but we will go with the consensus that it is “Paleo-friendly”.

Check out the other tasty and healthy products from Chia Charge Switerland. They even have a Chiaocolate Pudding Nut Butter made from brazil nuts, agave syrup and maldon sea salt flakes. Yum!

image2-46.JPGProcessed with VSCOcam with hb2 presetProcessed with VSCOcam with s2 presetimage1-63.JPG

INGREDIENTS (approx. 4 servings)

2 cups frozen mixed berries (450 g – I used a mixture of blackberries, raspberries and blueberries)

2 frozen sliced bananas

2 tbsp acai powder (25 g)

2 cups unsweetened coconut water (470 ml)

3 tbsp Chia Charge Coconut & Cashew Heaven Nut Butter (45 g)

1 tbsp agave syrup (20 g)

For toppings:

fresh fruit (I used mango, pomegranate and kiwi)

unsweetend coconut shavings

sliced raw almonds

INSTRUCTIONS

  • Place the frozen berries, frozen banana slices, acai powder, coconut water, nut butter and agave syurp and blend until smooth. The consistency should be a very thick smoothie, but still easy to pour.
  • Pour the mixture into individual bowls and add your choice of toppings


NOTES

  • When your bananas are super ripe and a bit too mushy to eat anymore, slice them up and place in the freezer. This is a great way not to waste over-ripened bananas and you don’t need to add in ice to your smoothies. Also, it prevents me from making so much banana bread.


Korean Mungbean Pancakes (Bindaetteok)

image3-33.JPG

If there’s one recipe I’m most proud of having learned from my mother, it’s definitely her Korean Mungbean Pancakes (Bindaetteok). My mom is one of the best cooks I know because when she cooks for people, she is so incredibly selfless and her food is genuinely made with love. If someone were to ask me what her best dish is, it’s her Bindaetteok, hands down.

Bindaetteok is a savory pancake made from dried mung beans, which are soaked in water then blended and mixed with vegetables and ground pork. This dish dates back to the late 1600s and originates from the northern part of Korea, which is where my mother’s side of the family comes from (pre-war) and are traditionally made on a full moon.

I think everytime my mom makes these pancakes, it brings back fond memories of her childhood. My mother grew up in Seoul with 6 siblings and 3 boy cousins who lived next door and she used to tell me how she remembers making these pancakes outside on a large iron skillet over an open fire, where she and her sisters and mother would always make a huge batch of Bindaetteok. They even had to grind the beans by hand using a stone grinder. And because during her childhood meat was expensive and hard to come by, they would make these pancakes with just vegetables and fry them in lard.

Until this day, my mom still only makes these pancakes on a full moon day and in celebration of the lunar new year tomorrow, I would like to share this very special dish with you that is very close to my family and to my heart.

Processed with VSCOcam with s2 presetimage1-54.JPGProcessed with VSCOcam with s2 presetProcessed with VSCOcam with s2 presetProcessed with VSCOcam with s2 presetimage2-40.JPGimage1-56.JPGimage1-57.JPGimage2-41.JPGimage2-42.JPGimage3-34.JPGimage1-58.JPGimage2-43.JPGimage3-35.JPGProcessed with VSCOcam with s2 presetProcessed with VSCOcam with s2 presetimage1-59.JPGimage2-44.JPGimage1-60.JPG


INGREDIENTS (approx. 5 dozen pancakes)

42 ounces dried mung beans (1.2 kg)

cold water for soaking mung beans

2 lb. good quality ground pork (900 g)

1 medium size head of Napa cabbage thinly chopped (800 g)

3 cups fresh mung bean sprouts (100 g)

3-4 scallions bunches sliced diagnolly (100 g)

1 large white onion sliced thinly (I used 2 small ones)

4 garlic cloves minced

1 inch ginger piece grated (2.5 cm)

2 tsp salt (11.5 g)

4 tbsp sesame oil (55 g)

freshly cracked black pepper

extra salt for batter mixture

vegetable oil for frying

For Dipping Sauce

1/2 cup soy sauce (150 g)

1.5 tbsp rice wine vinegar (25 g)

2 tbsp mirin (30 g)

freshly cracked black pepper

chopped scallions for garnch

a dash of Korean dry crushed red pepper (optional)


INSTRUCTIONS

  1. Pour the dry mung beans in a large colander and rinse in cold water for a few minutes.
  2. Place the mung beans in a large bowl and cover with cold water until the beans are fully immersed in water with at least 1 inch of water above the beans. Cover and soak them overnight at room temperature.
  3. Thinly chop the head of Napa cabbage and place in a large pot along with all of the fresh mung bean sprouts. Fill the pot with cold water until at least 1/2 of the vegetables are immersed in water. Boil for 3-4 minutes.
  4. Drain the cooked Napa cabbage and mung bean sprouts and rinse with cold water. Squeeze all excess water out of the vegetables and place them in a large mixing bowl.
  5. Add in the ground pork, thinly sliced white onions, sliced scallions, minced garlic, grated ginger, salt, sesame oil and freshly cracked black pepper. Mix well with your hands.
  6. Let the pork-vegetable mixture marinate overnight or for at least 2-3 hours in the refrigerator.
  7. To prepare the pancake batter, do not drain your soaked mung beans. Place 5 cups of the water soaked mung beans (just scoop generously from the middle of the bowl) in a blender and blend on high for about 1 minute or unil the mixture is smooth.
  8. Place the batter in a large mixing bowl and add 2 cups of the meat filling along with 1 tsp salt. Mix well.
  9. Turn your frying pan on high and add a generous amount of vegetable oil. When your pan is piping hot, pour approx. 1/4 cup of your pancake batter into the pan for each pancake. I was able to fit 3 pancakes at one time.
  10. Take a spoon and smooth out the pancake batter to make a nice circular and even shape.
  11. Once the bottom of the pancakes are golden brown, flip over and cook the other side until golden brown. I like to add a little bit more vegetable oil after I flip my pancakes to ensure each side is nice and crispy.
  12. Place the pancakes on a large plate lined with paper towels to soak up the excess oil.
  13. Mix the ingredients for your dipping sauce in a bowl and serve with the hot pancakes.


NOTES

  • You can store these pancakes in the freezer if well packed for up to 3 months.


Hummus with Zatar

Processed with VSCOcam with s2 preset

I first tasted my friend Aviva’s hummus over our New Year’s trip and I have to say that it is the best hummus I have ever had. Something about the creaminess and the kick of garlic makes this sensational.

I met Aviva just last May through a mutual friend in the U.S. and we bonded instantly over our love of food and cooking. In the last couple of weeks, I have had many opportunities to cook with her and what I love about Aviva is that she always cooks meals and dishes with 150% enthusiasm and effort AND her food is delicious.

I recently saw an episode of “The Mind of a Chef” when David Chang eats at the yakitori restaurant, Bird Land, in Tokyo. I remember the chef saying, “you cannot betray what they expect, but you have to go above it in some way too.” This resonates with me in how Aviva cooks because when she cooks a dish, she wants to make sure that it’s the best and she will take all the time to do it without shortcuts.

I am in no way trying to compare ourselves to a Michelin-starred chef, but I do believe and know that when you cook with so much effort and love, this does translate in your food. Well, as long as you CAN cook, that is…

After 2 coaching sessions, here is Aviva’s hummus recipe.

Processed with VSCOcam with s2 presetProcessed with VSCOcam with s2 presetProcessed with VSCOcam with s2 presetimage1-52.JPGProcessed with VSCOcam with c1 presetProcessed with VSCOcam with c1 presetProcessed with VSCOcam with s2 preset

INGREDIENTS

4 cups (500 g) dry chickpeas

water to soak & cook chickpeas

1 1/4 cups (295 ml) water

3/4 cup (180 g) tahini

6 tbsp (87 g) extra virgin olive oil

3 tsp (17 g) salt

2 lemons, cut into segments

6-7 cloves of garlic

For Garnish:

zatar (optional)

premium extra virgin olive oil (optional)


INSTRUCTIONS

  1. Place your dry chickpeas in a large bowl or pot and fill with cold water until the chickpeas are fully immersed in water with at least 1-2 inches of water above the peas. Cover and soak them overnight at room temperature.
  2. Drain the chickpeas and place them in a medium-size pot and fill with water again until the chickpeas are fully immersed in water with about 1 inch of water above the peas. Bring the peas to a boil and continue to boil at a medium-high heat for approximately 25-30 minutes or until well-cooked (this may vary depending on the brand of chickpeas so taste to see if they are tender after at least 20 minutes).
  3. When the chickpeas are fully cooked and tender, drain them, rinse with cold water and let them cool to room temperature.
  4. Place the cooked chickpeas into a large food processor (if you have a smaller one, you can work in 2 batches) along with 3/4 cup of water, 3/4 cup tahini, 6 tbsp extra virgin olive oil, 3 tsp salt, lemon segments and garlic cloves. Pulse on a high speed until all ingredients are well blended. It will take several minutes for the chickpeas to become well blended.
  5. Check the consistency of your hummus and add in the remaining water in a 1/4 cup at a time as chickpeas can vary in how much water they absorb during the soaking process. If needed, add in more water to your liking of consistency.
  6. Garnish with zatar and a generous drizzle of premium extra virgin olive oil and serve with your choice of fresh vegetables.


NOTES

  • This hummus is extra good with kohlrabi sticks, which is a vegetable I only became familiar with when I moved to Switzerland. Another name for kohlrabi is German cabbage and it’s crunchy, sweet and delicious. Apparently, it’s Heidi Klum’s favorite snack.

Andre’s Roasted Chicken & Vegetables

Processed with VSCOcam with s2 preset

This is a recipe I have been wanting to share for over 5 years and it is one of the reasons I started a cooking blog. This dish is a bit nostalgic for me because the night I met my husband-to-be, he made a whole roasted chicken over an open fire and because we had quite a bit of wine leading up to the main course, the chicken was a bit under cooked and he still talks about it with embarassment. And it really is one of the ONLY times he has not cooked a dish perfectly.

Roasted chicken is one of those dishes I have found to be so simple and when cooked properly, it’s one of the best meals one can have and you never get sick of. HOWEVER, it’s also one of those dishes that can easily be over cooked and the meat can very well be dry. My husband’s roasted chicken recipe is something I am very excited to share because it is very easy to make and you will always end up with a chicken that is juicy and moist in the inside and crispy on the outside, which is the perfect and only acceptable version of a roasted chicken, in my opinion. His method as you will see is using vegetable broth on the bottom of the pan to steam the chicken ensuring the moistness of the meat and at the same time, giving the chicken and the vegetables flavor. I also love this dish because you can always change up the spices, herbs and vegetables and it’s something you can eat on a regular basis.

Here is Andre’s recipe for a roasted chicken and vegetables.

Processed with VSCOcam with s2 preset

Processed with VSCOcam with s2 preset

Processed with VSCOcam with s2 preset

Processed with VSCOcam with s2 preset

Processed with VSCOcam with s2 preset

Processed with VSCOcam with s2 preset

image2-32.JPG

Processed with VSCOcam with s2 preset

Processed with VSCOcam with k3 preset

Processed with VSCOcam with k3 preset

Processed with VSCOcam with k3 preset

Processed with VSCOcam with s2 preset

image1-47.JPG

INGREDIENTS (approx. 4 servings)

For the chicken marinade:

3 lb. free-range whole chicken

1/2 cup extra virgin olive oil

juice of 1/2 lemon

1 tbsp herb salt (or can sub with kosher salt coarse sea salt)

freshly cracked black pepper (to taste)

5 garlic cloves smashed

handful of fresh thyme sprigs

slice the other 1/2 of a fresh lemon into 3-4 thin slices

For the roasted vegetables:

2 tbsp extra virgin olive oil

1 large white onion roughly chopped (I used 2 medium sized ones since my grocery store fails to stock large ones)

5 carrots roughly chopped

1 fennel bulb roughly chopped

3 sweet potatoes roughly chopped

1 yellow bell pepper roughly chopped

handful of green beans

handful of cherry tomatoes (I like to keep the stems on)

2-3 sprigs of fresh rosemary

2 tbsp vegetable seasoned broth (I prefer Knorr)

4 cups boiling water


INSTRUCTIONS

  1. Butterfly your whole chicken by placing your chicken breast-side down on a cutting board. Working from the cavity opening at the neck, cut down the middle of the back-bone with a pair of kitchen shears all the way to the other end of the chicken. I don’t cut the back-bone out, but you can if you would like.
  2. Clean your chicken in cold water getting rid of any excrements in the inside. I also like to cut off any excess skin, the neck bone and the tips of the wings since they aren’t edible.
  3. Place your chicken in a baking dish or any deep dish that you can fully lay out your chicken. Drizzle a 1/2 cup of extra virgin olive oil over your chicken and the juice of 1/2 a fresh lemon. Then sprinkle a 1/2 tbsp of herb salt or kosher salt on the breast side of your chicken, making sure to distribute evenly. Then season this side with freshly cracked black pepper generously.
  4. Turn your chicken over so the cavity is exposed and sprinkle another 1/2 tbsp of herb salt or kosher salt making sure to distribute evenly. Then season this side with freshly cracked pepper generously.
  5. Add in the 5 smashed cloves of garlic, the fresh thyme sprigs and the slices of the other half of your fresh lemon.
  6. Massage your chicken to ensure the whole chicken is well seasoned.
  7. Wrap the dish with your chicken in plastic wrap and marinate for at least 4 hours and up to 24 hours in the refrigerator.
  8. Clean, peel and roughly chop your choice of vegetables. Just try to keep in mind the cooking times of your veggies and cut them accordingly, but I generally just roughly chop them as pictured.
  9. Preheat your oven to 475 F (250 C) and take your chicken out of the refrigerator.
  10. In a large frying pan, heat on high and add in approx. 2 tbsp of extra virgin olive oil. Add in your chopped onions and then each vegetable one at a time (I start with onions and then add in the vegetables with the most cooking time first because you want to keep the frying pan hot to brown the vegetables).
  11. Mix 2 tbsp of vegetable broth with 4 cups of boiling water and mix well.
  12. Saute your vegetables for about 5-7 minutes or until a bit browned and then add in your vegetable broth and saute for another 2-3 minutes.
  13. Pour your vegetables and the broth onto a baking pan or baking dish, making sure to distribute an even layer.
  14. Take your marinated chicken and place it on top of the vegetables butterflied down (breast side facing up) and your rosemary springs underneath your chicken (to prevent burning, I also like to make sure the smashed garlic cloves are not on top of the chicken as not to become bitter).
  15. Place this in the oven at 475 F (250 C) for 45 minutes (make sure the heat is on up top and on the bottom).
  16. Every 15 minutes, take some broth from the bottom of the pan and pour it on top of the chicken to keep moist.
  17. After baking for 45 minutes, turn your oven on grill for approx. 5-7 minutes. This may vary from oven to oven, so keep your eye on your chicken to make sure it is not burned but grilled to a beautiful golden-dark brown.


NOTES

  • Please keep in mind that the chickens in Switzerland tend to be smaller in size than in the U.S. and cooking times may vary depending on the size and the oven. When in doubt, before you turn your oven on grill, you can check your meat to make sure it’s cooked all the way through and if necessary, bake the chicken a bit longer. If it is cooked through, turn your oven on grill.
  • Make sure to season your chicken well. The key to this dish is to overseason a bit than you are normally used to with meat.
  • If you don’t have herb salt, you can also mix regular kosher salt and Old Bay is one of my favorites for this dish.

Swiss Raclette

Processed with VSCOcam with a6 preset

One of my favorite meals during the winter time is Raclette, which of course was one of the meals we enjoyed during our NYE trip to the French Alps. And when you are in a cozy chalet in the mountains or anywhere else that is cold, this dish is an absolute must and it’s a fantastic meal to share with a large group. And for me personally, I prefer Raclette a hundred times over fondue, but that’s just me.

So what is Raclette? Raclette is a semi-firm cow’s milk cheese that is typically served melted over boiled potatoes and is traditionally found in the Swiss and French Alps during the cold months. The name is derived from the French word racler, which means “to scrape”. Raclette cheese is either melted over an open fire, or with a special grill that melts the cheese directly from the wheel, or most commonly on a special Raclette table top grill. Now the key to a good Raclette is of course the cheese and secondary are the side condiments.

My husband and I prefer a non-pasteurized Raclette because it tends to melt more smoothly. We also ALWAYS buy our cheese from a local cheesemaker,  Dorfkäserei Küssnacht, in the town of Küssnacht am Rigi. Their Raclette is just the best and surprisingly cheaper than the average Raclette you find in the normal Swiss grocery stores.

Processed with VSCOcam with s2 preset

Now let’s talk about the sides and condiments for Raclette. As mentioned before, Raclette is typically melted over boiled potatoes. The Swiss typically use Amandine or Charlotte potatoes, which are smaller in size and still stay relatively firm when fully cooked (you don’t want mushy potatoes). Raclette is also traditionally served with anything pickled on the side, such as cornichons, pearl onions and baby corn. For our Raclette dinner, we were fortunate enough to include homemade curried pickled squash made by my brother-in-law and pickled tomatoes made by the uncle of my Polish colleague into the mix of our pickled sides. And for seasonings, try freshly ground nutmeg, freshly cracked black pepper, curry spice mix, piri piri or your favorite smoked chili.

Processed with VSCOcam with s2 preset

I hope these pictures inspire some of you to enjoy a Raclette dinner in your homes during these cold months. And please know that everyone has different preferred sides and condiments and you can try whatever you think tastes good with melted cheese, even curry ketchup. And try pairing your Raclette with a nice crisp white wine like a Fendant. For those in the Luzern area, try the Solaris white wine from the organic winery Sitenrain in Meggen. It is absolutely delicious!

Processed with VSCOcam with a6 presetimage2-25.JPGimage1-37.JPGProcessed with VSCOcam with s2 presetimage1-34Processed with VSCOcam with s2 presetProcessed with VSCOcam with a6 presetProcessed with VSCOcam with s2 presetProcessed with VSCOcam with a6 preset

INGREDIENTS (4-6 servings)

Raclette cheese: 7-14 ounces per person / 200-400 grams per person

Boiled Raclette potatoes (Charlotte or New Potatoes work great): 1/2 pound per person / 250 grams per person on average

1 jar of cornichons or your favorite pickles

Other pickled sides such as pickled pearl onions, pickled hot peppers, etc.

2 large onions thinly sliced to melt with your cheese

1/4 pounds or 125 grams of thinly sliced smoked bacon to melt with your cheese

Freshly ground nutmeg

Freshly cracked black pepper

Hot pepper flakes or piri piri


INSTRUCTIONS (for a table top Raclette grill)

  1. Boil your potatoes in salted water until well cooked.
  2. Slice your Raclette into approx. 0.4 inches / 1 cm slices or a size appropriate for your Raclette pans and place them on large platter.
  3. Thinly slice 2 large onions and place into a small bowl or two for the table.
  4. Thinly slice the smoked bacon and place into a small bowl or two for the table.
  5. Place all of your preferred pickled sides and spices onto the table around the Raclette table top grill.
  6. Once your potatoes are fully cooked, drain the water and place them into a bowl covered by a kitchen towel to stay warm.
  7. Turn on your Raclette grill and start melting some cheese!


Toast Skagen (Prawns on Toast)

Processed with VSCOcam with s2 preset

This holiday season, I was lucky enough to spend New Year’s Eve with 3 of my favorite girlfriends in Switzerland plus their families in a cozy chalet in a small town just a few miles outside of Chamonix in the French Alps. These lovely ladies also happen to be some of the best cooks I know, which was important considering we cooked 2-3 meals a day for 9 adults plus 6 kids (between the ages of 1-6) over a course of 5 days. Yes, that’s a lot of food! Some of our meals included Saltimbocca with Porcini Risotto, Swiss Raclette, Chinese Hot Pot and much much more.

In the next couple of weeks, I will be sharing some of the fantastic meals and recipes that were shared on this beautiful trip among a wonderful group of friends who love to enjoy good food, good wine and most importantly, good company.

Processed with VSCOcam with a5 presetimage1-32.JPG

The first recipe is the traditional Swedish Toast Skagen (Prawns on Toast) that my Finnish friend Jenni made on New Year’s Eve for an apéro. The one thing I love about the Europeans is that they love their apéro, which is just another term for “cocktail hour” and there are always small bites to eat to wet your appetite. This is also my favorite part of the meal, except for the fact that I usually eat too much and by the time we sit down for dinner, I am usually almost always full.

Toast Skagen is a perfect starter for a celebratory meal and try pairing them with Champagne (we were drinking Philippe Gonet & Veuve Clicquot) and oysters on the half shell. That’s what we did since we were in France and it’s obligatory, right?

image1-27.JPGimage2-18.JPGProcessed with VSCOcam with s2 presetProcessed with VSCOcam with s2 presetProcessed with VSCOcam with s3 presetProcessed with VSCOcam with s2 presetProcessed with VSCOcam with s2 presetProcessed with VSCOcam with s2 presetProcessed with VSCOcam with s2 presetProcessed with VSCOcam with s2 preset

INGREDIENTS (approx. 2-3 dozen toasts depending on size of bread)

3/4 cup créme fraiche

1 tbsp fresh squeezed lemon juice

1/2 tsp lemon rind

1/2 tsp salt

2 tbsp chopped dill

freshly cracked black pepper

1 cup chopped cooked shrimp (I used about 1 dozen of the small 51/60 size)

For the Toast:

1 large baguette (cut into 1/2 inch slices)

3 tbsp extra virgin olive oil

1 large fresh garlic clove minced

salt and pepper to taste

For the Garnish:

chopped dill

chopped shallots (or red onions or green onions)

lemon rind (optional as I used my leftovers)

salmon roe

freshly cracked black pepper

INSTRUCTIONS

  1. Preheat your oven to 400F and on the grill function, which I think is the best and quickest way to make toast.
  2. Slice your baguette into about 1/2 inch slices and place them on a baking tray lined with parchment paper.
  3. In a small bowl, mix the olive oil, minced garlic and a pinch of salt and pepper. Brush this mixture onto each piece of sliced baguette. Set aside for now.
  4. In a medium bowl, whisk the créme fraiche, freshly squeezed lemon juice, lemon rind, salt, dill, pepper and cooked shrimp. Mix until the ingredients are well incorporated and place in the refrigerator until you are ready to assemble your toasts.
  5. Place the baguette slices into the oven for about 3-4 minutes or until golden brown. Make sure you watch them as this might take a bit longer or shorter depending on your oven. Once they are golden brown, let the toasts cool down to room temperature.
  6. While your toasts are cooling down, prepare your garnishes.
  7. When you are ready to assemble, place a generous spoonful of the shrimp mixture onto a toast and garnish with dill, shallots, lemon rind, salmon roe and freshly cracked black pepper.


NOTES:

  • I would try to stay away from using baby shrimp for this dish. Baby shrimp tend to have little texture and are quite mushy and not appetizing in my opinion.


Korean New Year’s Day Soup (Duk Mandu Gook)

image1-22.JPG

One of my life regrets is that I never learned how to speak Korean, especially knowing that I could truly have been bilingual having grown up in America and in a Korean immigrant family. Only speaking one language has even felt more like a handicap now that I live in Europe. For example, I work in an office of about 100 people and I among the other 7 Americans and Brits are probably the only ones who don’t speak a second or third language fluently. Embarrassing? Yes.

I do however feel proud that I can cook Korean food. When I was growing up, I always hung out in the kitchen with my mom as a way to get out of practicing the violin or piano (I know, super Korean). I would always ask to help season soups, peel garlic, assemble mandu (Korean dumplings) or even take the stems off bushels of soy bean sprouts. Looking back now, I am very thankful to have spent so much time with my mom in the kitchen because cooking Korean food has become something natural to me and of course I get to enjoy a meal that’s absolutely delicious and always brings me back home.

I know it’s already 5 days past New Year’s Day, but I had to make this because I’ve been eating this soup almost every start of the new year since I was born. And to be honest, I didn’t make this on the 1st because frankly, it’s a lot of work and was not in any condition to be working in the kitchen most of the day, but I tell you it’s worth it! And of course, this soup can be enjoyed anytime of the year, but it is most traditionally served on New Year’s Day in Korea to honor becoming a year older. I hope you enjoy this recipe and share it with your loved ones!

Oh and I just realized as I was writing this blog post that I forgot the roasted seaweed as a garnish, but it’s still delicious without it!

Continue reading “Korean New Year’s Day Soup (Duk Mandu Gook)”

Finnish Gingerbread Cookies by Jenni’s Mom

image1-12.JPG

One of the best things about living abroad is meeting people from all over the world and the one thing you always have in common is navigating this country called Switzerland. I am incredibly grateful to have become great friends with one of my colleagues, who also happens to be the first Finnish person I ever met. Last year, I happen to taste her mother’s gingerbread cookies and I have to say, they were the best I had ever tasted. Thank you to Jenni’s mom for this lovely recipe and to everyone a Merry Christmas!

Continue reading “Finnish Gingerbread Cookies by Jenni’s Mom”